I am a portrait photographer. I love the Lomography Petzval 85 lens — a modern, manual focus lens based on a 19th-century design.
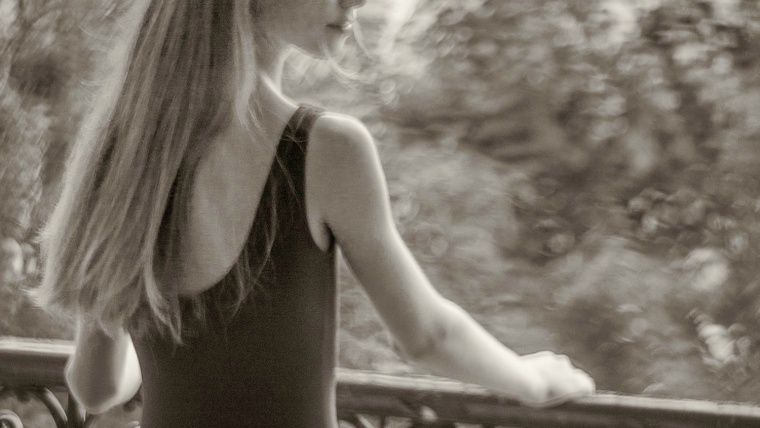
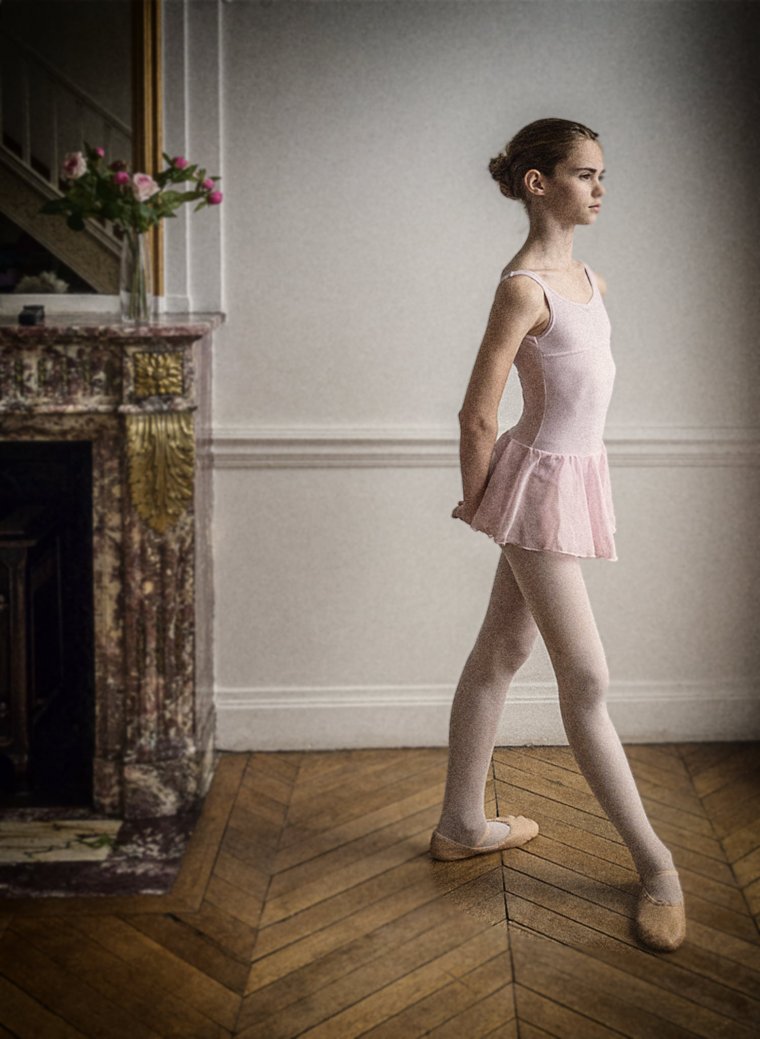
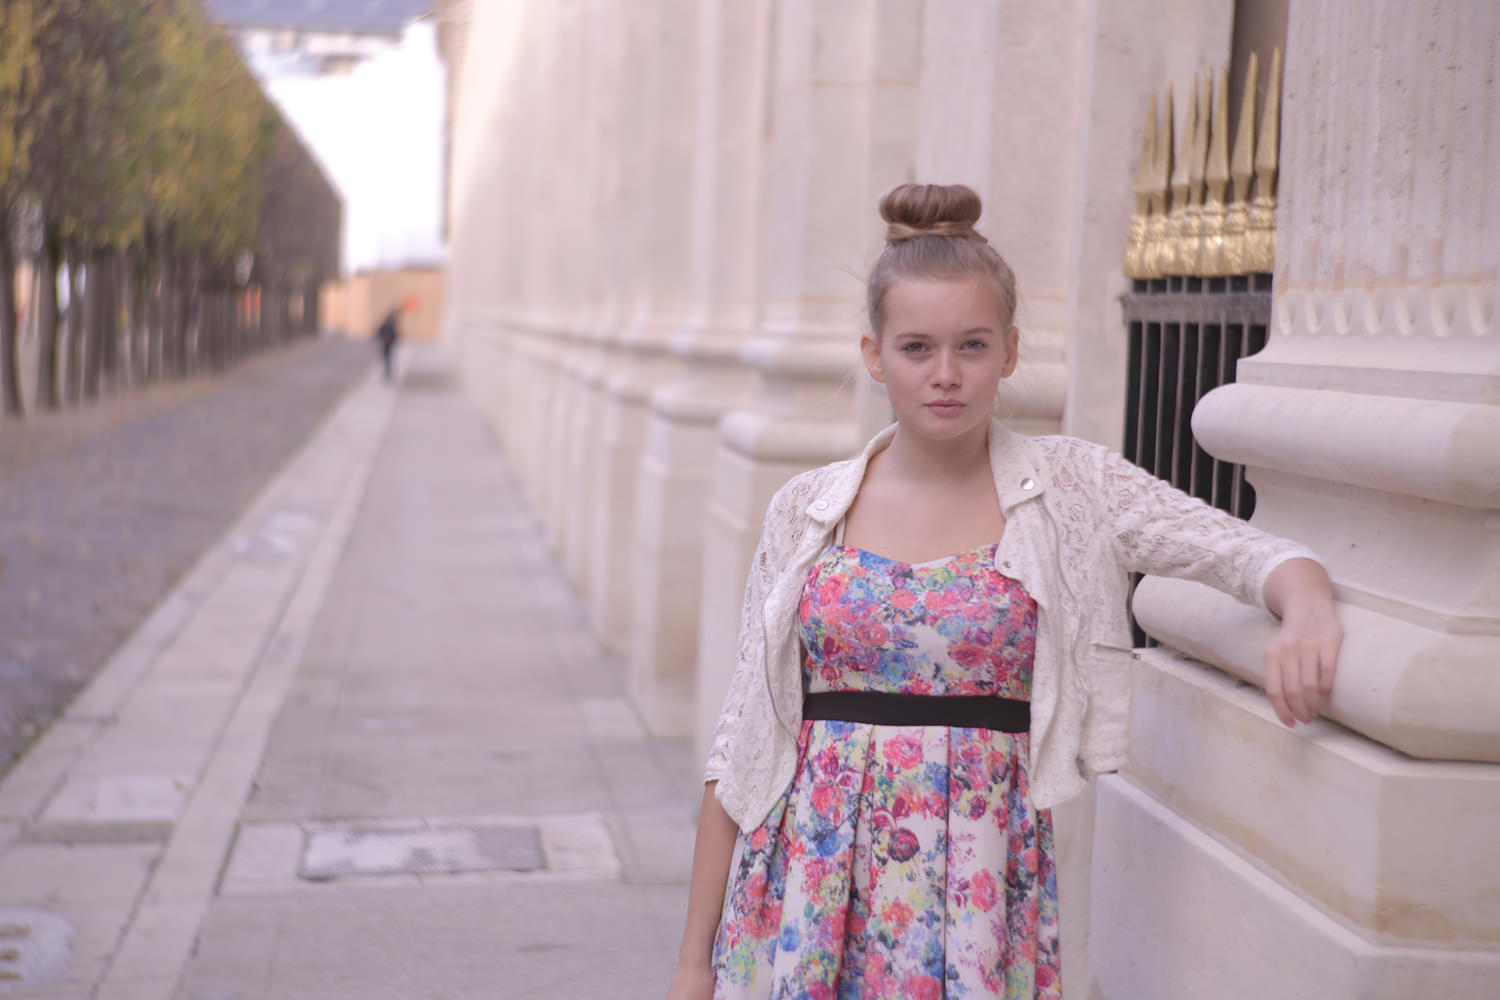
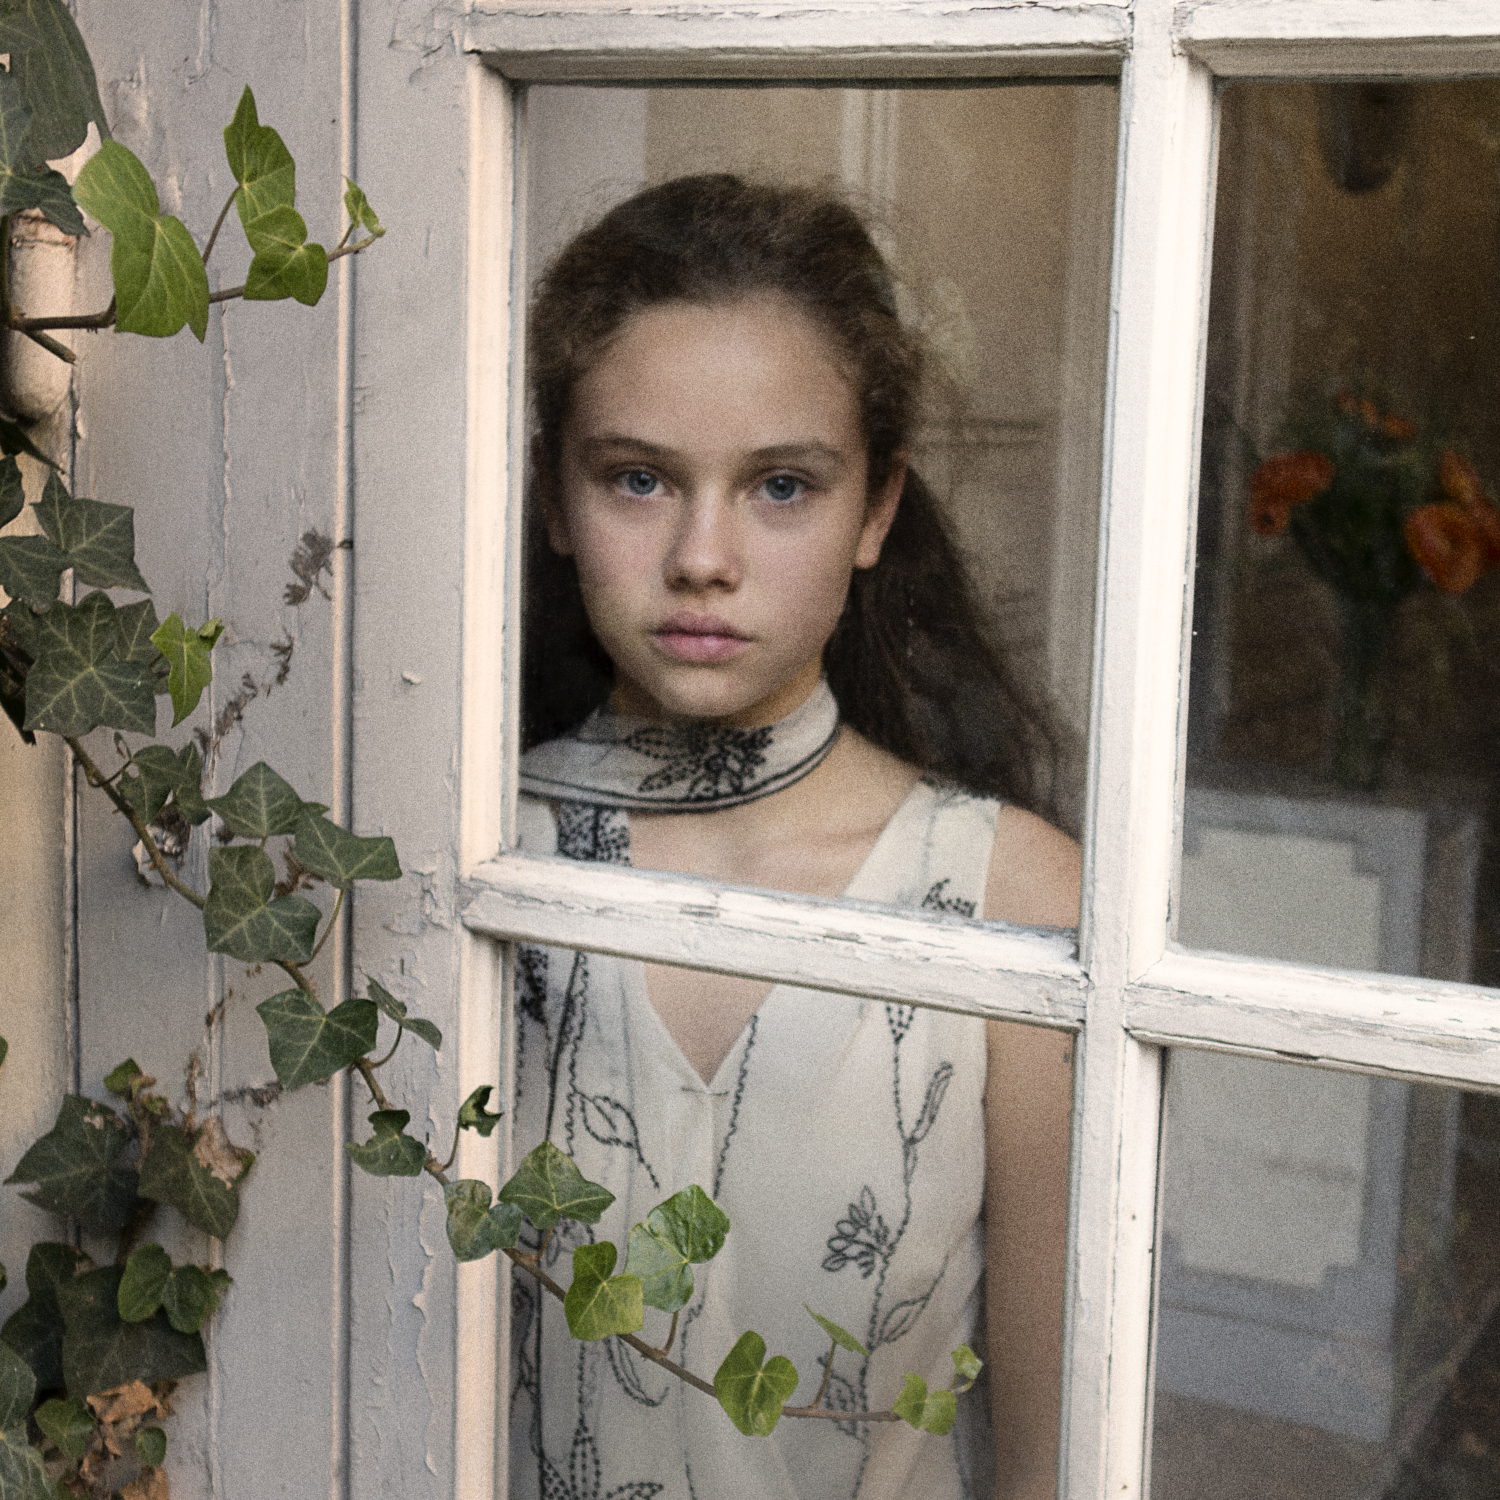
It creates images with a distinctive feel on many levels. Highly selective focus. Beautiful swirly out of focus backgrounds. Rich and vivid colors. But like many great relationships, this one has taken a lot of effort to make it work. That effort has all been worthwhile for me because the Petzval has allowed me to photograph what I have long seen in my mind. This lens also surprises me at times. That funky, unpredictability is a big attraction for me.
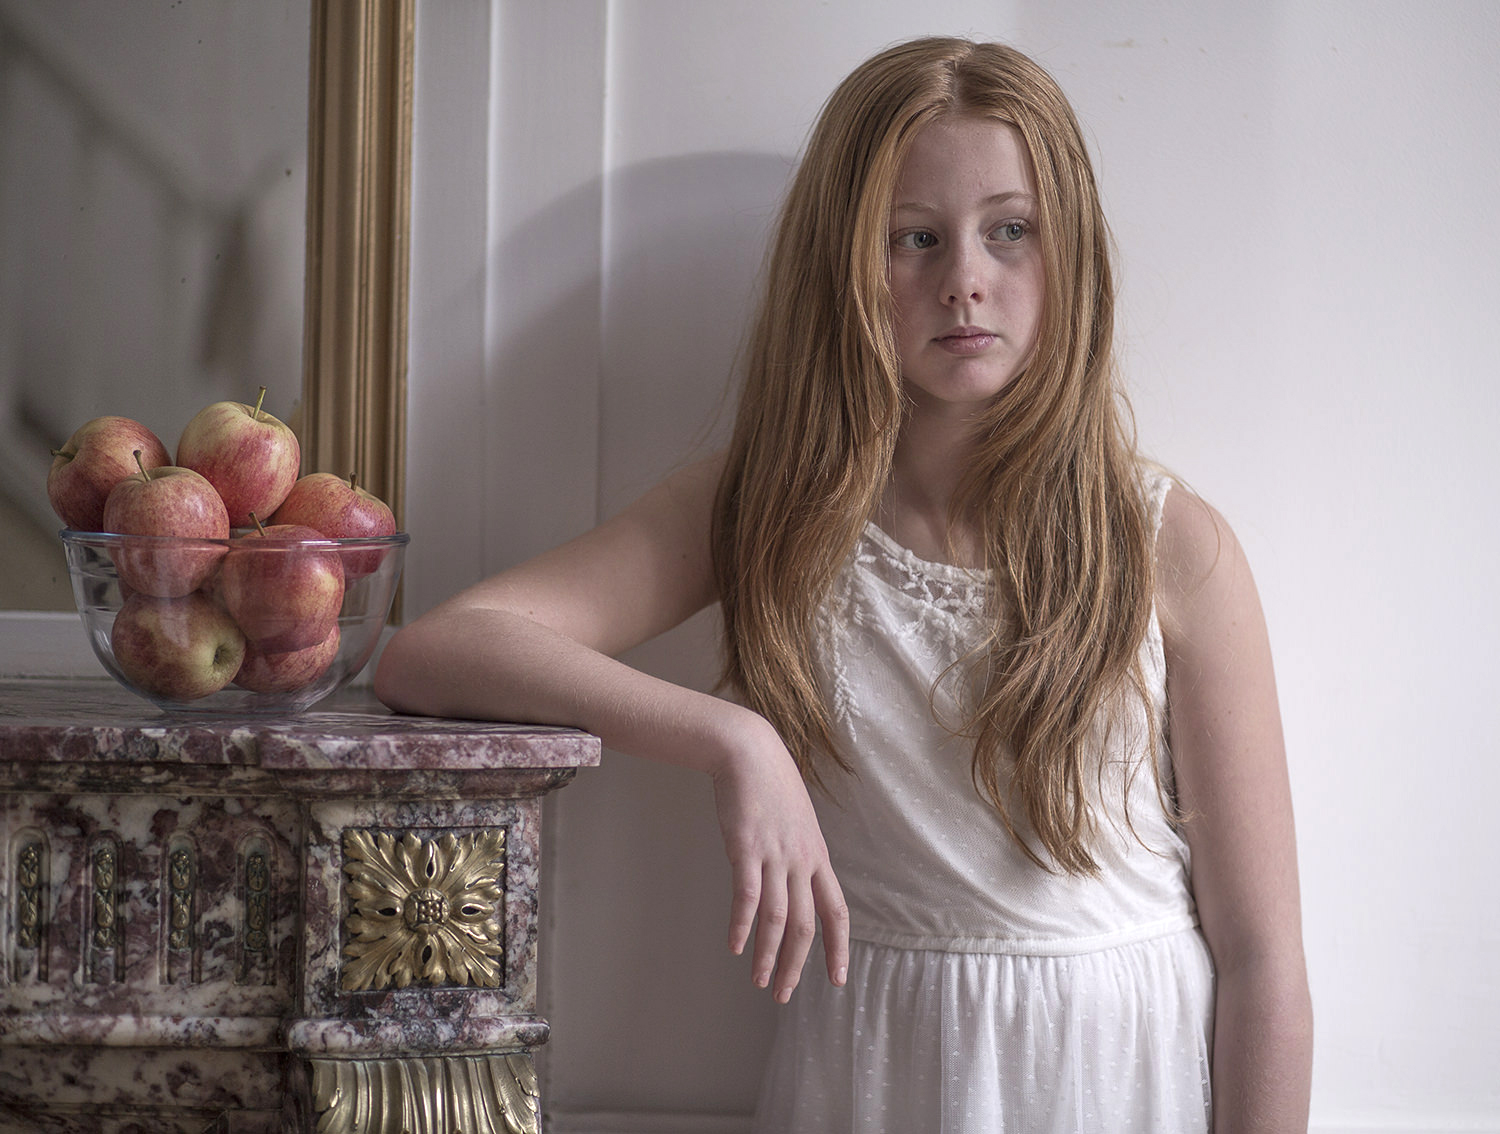
But getting the image right can be a fight. Let me say at the outset that I shoot with this lens wide open, so I am working on a very narrow depth of focus. I do that because I find the lens at its most distinctive and attractive wide open. That narrow depth of field is an important part of my vision and technique. Also, I am 66 years old and my eyes are not as sharp as they used to be. So the experience of others may be different. In any event, understand that this is a manual focus lens which means your eye and a steady hand are the keys to success.

Before we get started, let me also note that the techniques that follow for conquering the Lomography Petzval are equally applicable to any manual focus lens that you may put on your Canon EOS camera. Of late, I have been using Russian lenses from the 1980’s and my old Olympus Zuiko lenses from the 1970’s, all of which have their own distinctive characteristics. I am able to achieve close to 100% success in focus using the techniques I discuss below. (I will review the use of older traditional lenses on modern cameras in a later article.)
So with that disclaimer… If the Petzval lens is simply mounted on my 5D Mk III and I shoot through the viewfinder, it is a challenge to get images that will hold the focus where I want it (usually an eyelash). Of course, this is less of an issue as the distance to the subject increases. When I am shooting wide open at say 6 feet from the subject, the depth of field is paper thin. At 20 feet it is more like two feet. So the degree of challenge of the lens is a reflection of how you are going to use it. This is not just my problem. I know of other photographers who have experienced significant frustration dealing with focus.
None of this is a criticism of the Petzval lens. It is beautifully made, produces wonderful images and is very reasonably priced. I commend the Lomography folks for its development. They have done a fine job and deserve great credit. The Petzval is an ancient design, manual focus artifact that has been updated to modern times to allow it to be attached to the latest Canon cameras. The only shortcomings are the techniques of its use. Those must be attended to carefully to assure the best result.
To those of you intrigued with the lens — don’t despair! First, you may find that your use of the lens and your eagle eye allows you to use it out of that box without a hitch. If you are in this group you are going to have a great time with this lens. But if you do experience “focus frustration”, I have found a technique that lets me hit the focus and exposure more than 95% of the time. It isn’t fast and it requires a bit of work. But compared to what photographers needed to do to get good images with Peztval lenses 150 years ago, the effort is very small. And for me at least, it is well worth the investment of time and effort.
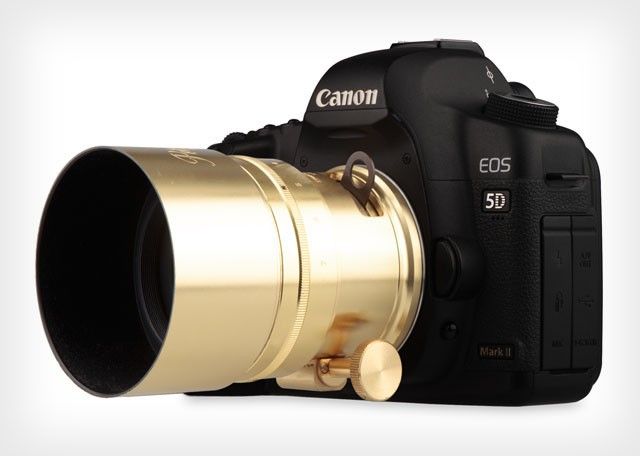
That adds up to an interesting combination of old and new technology. I bought the lens on impulse in Paris in the 2014 year as I was getting ready for several shoots over the next few days. That was not smart but it worked out okay. I got some good images though some eluded me as I shot through the viewfinder. Since that time I have tweaked my technique to allow me a much higher incidence of properly focused images.
Table of Contents
I like selective focus. It is a big part of my portraiture. So I shoot wide open. On the Petzval, that translates into the maximum aperture of f/2.2. The lens comes with removable aperture plates that allow you to stop it down. Mine are still in the box. If you do use the stops you need to take care that they don’t fall out when you are shooting. (This is apparently less of a problem with newer versions of the lens). This means that the lens is reasonably fast but the depth of field is very narrow, which is perfect for me. The view will darken as you stop the lens down. Of course, you can always remove the plates, focus, reinsert the plate and shoot. But that is not practical for any situation except still life or portraiture with the camera mounted on a tripod and a very still model.
The basic lens design dates back to 1840. At the time of its invention, the Petzval lens revolutionized portrait photography. It dramatically reduced the amount of time that a sitter had to remain before the camera. But it was then, and is today, a manual focus lens. This was a challenge when mounted on an 8 by 10 view camera, and it is an even larger challenge to anyone trying to achieve good focus on a DSLR.
For me, the greatest challenge has been to optimize the wonderful Canon 5d mIII in a manner that maximizes its ability to focus the lens. This requires a bit of work but hey, if it was easy it would not be fun! The essence of what I do is this:
To accomplish this, simply install a simple LCD viewfinder and shoot in Live View. The advantage here is that the 5d MkIII has a 3.2″ (8.11cm) 1.04 million-pixel Clear View II LCD Screen. That adds up to a lot of visual information. You then have two choices to magnify the image further to assist you in your manual focusing:
Method A (most basic): Press the Zoom button to enlarge the image and focus. Pressing it once will increase the image X5. Pressing a second time will increase the image X10. Press it a third time and the image will return to normal size. This is workable but cumbersome. You may find that simply installing the LCD viewfinder and shooting in LiveView gives you the control and precision you need. I suggest that you try this step first and proceed incrementally.
Method B (more advanced): Install supplemental firmware called Magic Lantern on your Canon (at your own risk). Tweak the Magic Lantern firmware to give you 10x zoom when you half press the shutter button. Take your time, go slowly and Bingo — you will get shot after shot in”perfect” focus. It will also allow the camera to display “zebra stripes”, i.e. focus peaking. This is a very helpful tool in accurate manual focusing, particularly with the Petzval. Later model cameras are now adding this feature (particularly newer Sony cameras). For some reason, Canon has elected not to include this capability in its firmware for the 5D Mk III. The camera is capable of using this tool with Magic Lantern installed. The use of Magic Lantern adds a layer of complexity and risk in the setup. However, now that it is on my camera I would not shoot any other way. Information about the installation and use of Magic Lantern are set out below.
The LCD viewfinder is a simple device that lets you clearly see the full LCD screen in live view. It also lets you focus even in bright sunlight. You can spend a lot of money on these but I bought the KAMERAR QV-1 on Amazon for $79.00 and it has worked extremely well for me.
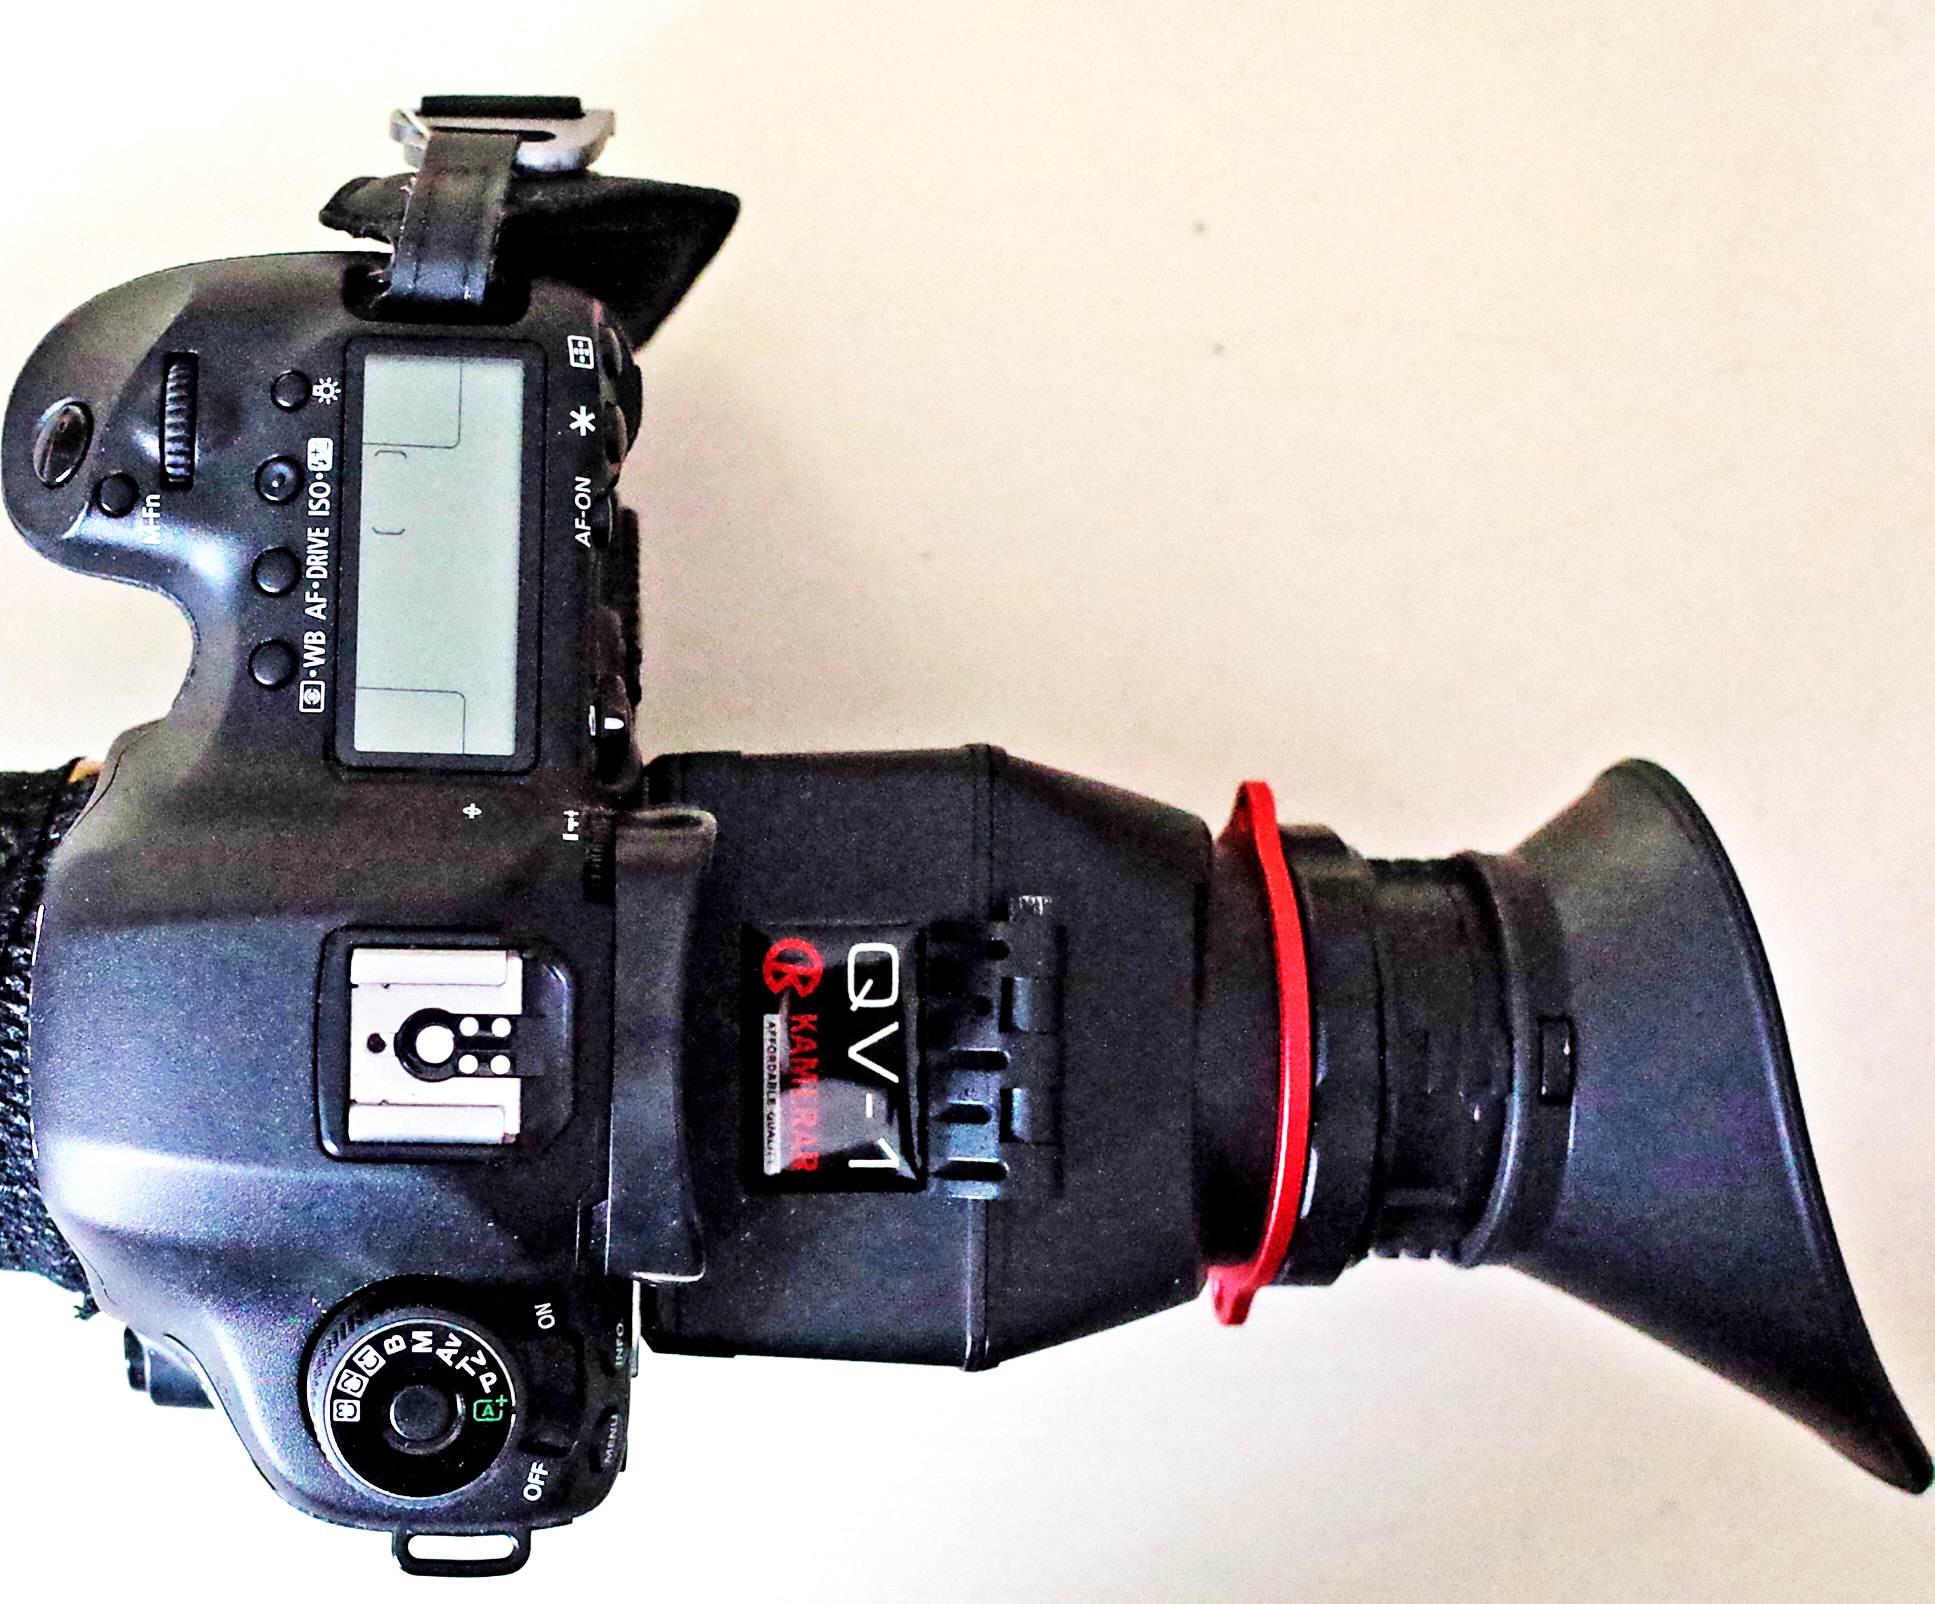
It is held in place by a single 1/4 screw that attaches to your tripod mount on the bottom of the camera. The QV-1 allows you to mount the camera and viewfinder on the same tripod you would use for the camera alone. The viewfinder is easily centered against your display at the back of the camera. The eyepiece is held in place with a magnet and is easily removable. and replaceable. The total installation time is about 1 minute. Shooting in LiveView with the viewfinder gives you a much larger image to evaluate and to use for tweaking your focus.
If you find that you are not getting the consistency of result (i.e. focus) that you desire simply using the Canon firmware (i.e. pressing the Zoom button), your next step is to install and shoot with Magic Lantern (“ML”). “ML” is a supplemental firmware (shareware) for your Canon camera. It is free. You can read a lot about it on the web. If you put the name into your favorite search engine you will get many hits. The official website, with downloads, at http://magiclantern.fm/
Let me be clear that there are potential risks to using Magic Lantern. Search on that topic as well. As the developers point out: “ Warning! Magic Lantern is not approved nor endorsed by Canon in any way, and using it will probably void your warranty. We are not responsible for any damages to your camera.”
That sounds more than a little scary I admit. The risks, among others, are that MagicLantern will cause your lovely camera to “brick”, i.e. seize up and become an unstable piece of plastic. If you are tempted to go to this next step, you owe it to yourself to spend some time researching the issue on the net. I did, and speaking only for myself I concluded that the risk was remote, particularly in light of the later refinements of the program. You can scare yourself out of doing much of anything if you focus on what might happen, but you have many more options in life if you consider the likelihood (or lack thereof) of something going wrong.
Here is what the Magic Lantern Wiki has to say:
“As of September 2009 the software has been downloaded over two thousand times and there have been no reports of damage to the cameras. While this is no guarantee of absolute safety, the stable releases have been tested by beta testers.
So let me also say that I have had no problems whatsoever with ML and it is now an integral part of my shooting with the 5D MkIII. Many very experienced photographers and videographers report a similar experience. You can (and should) read of the experience of the many users who have made the same decision. Almost all that I have seen have had a good experience. MagicLantern has many users who are willing to endure some level of risk because of the tremendous versatility afforded by this firmware. It adds many terrific features to your camera, including many that are important to success with the Petzval. Most of the folks who install it appear to be DSLR videographers and many of its features relate to that use. But several key features — particularly those improving options for zoom focus and exposure evaluation (discussed below) — are very helpful to still photograph shooters as well.
At the end of the day, my tolerance for risk may be higher than yours and that is fine too. But for me, I am willing to stick my neck out a bit to get the images I want and this is part of the bargain I have made with myself.
The installation instructions are found on the ML Wiki. Read and follow those instructions carefully. In essence, you download the problem to your computer and then copy it to an SD disk that you put into your camera and boot up. The disk remains in your camera at all times. You can also put your images onto the disk as you are shooting. After you have downloaded the images you can reformat the disk and ML will reinstall itself. With the 5D Mk III and perhaps other cameras, you can also put the program on an SD disk and set the camera to put the images on a separate SD disk. You need to take care how you remove that disk! Read the instruction carefully.
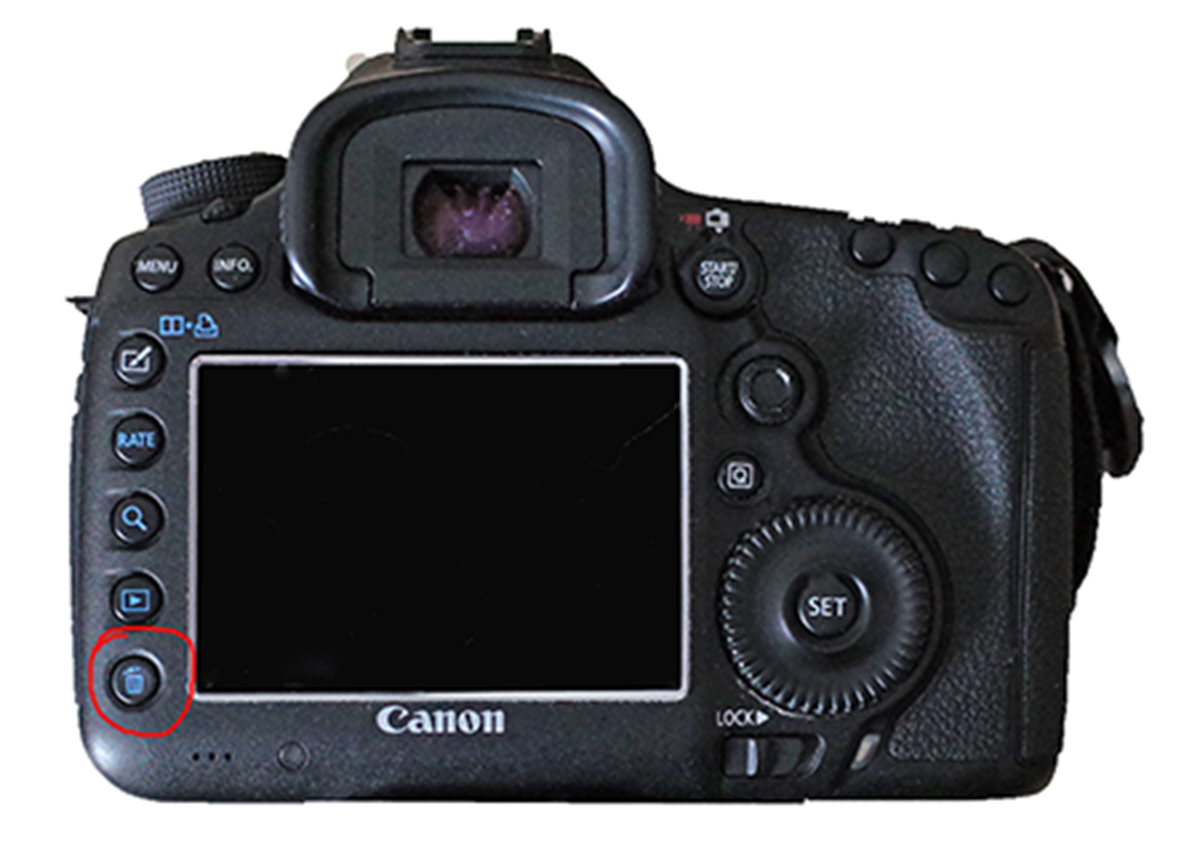
Once the ML firmware is installed you invoke the ML menus by pressing the delete (garbage can button).
As a first time user, you must then address the settings in the ML menus. The standard Canon menus remain available by hitting the menu button, but the magical options of ML require you to go into the ML menu.
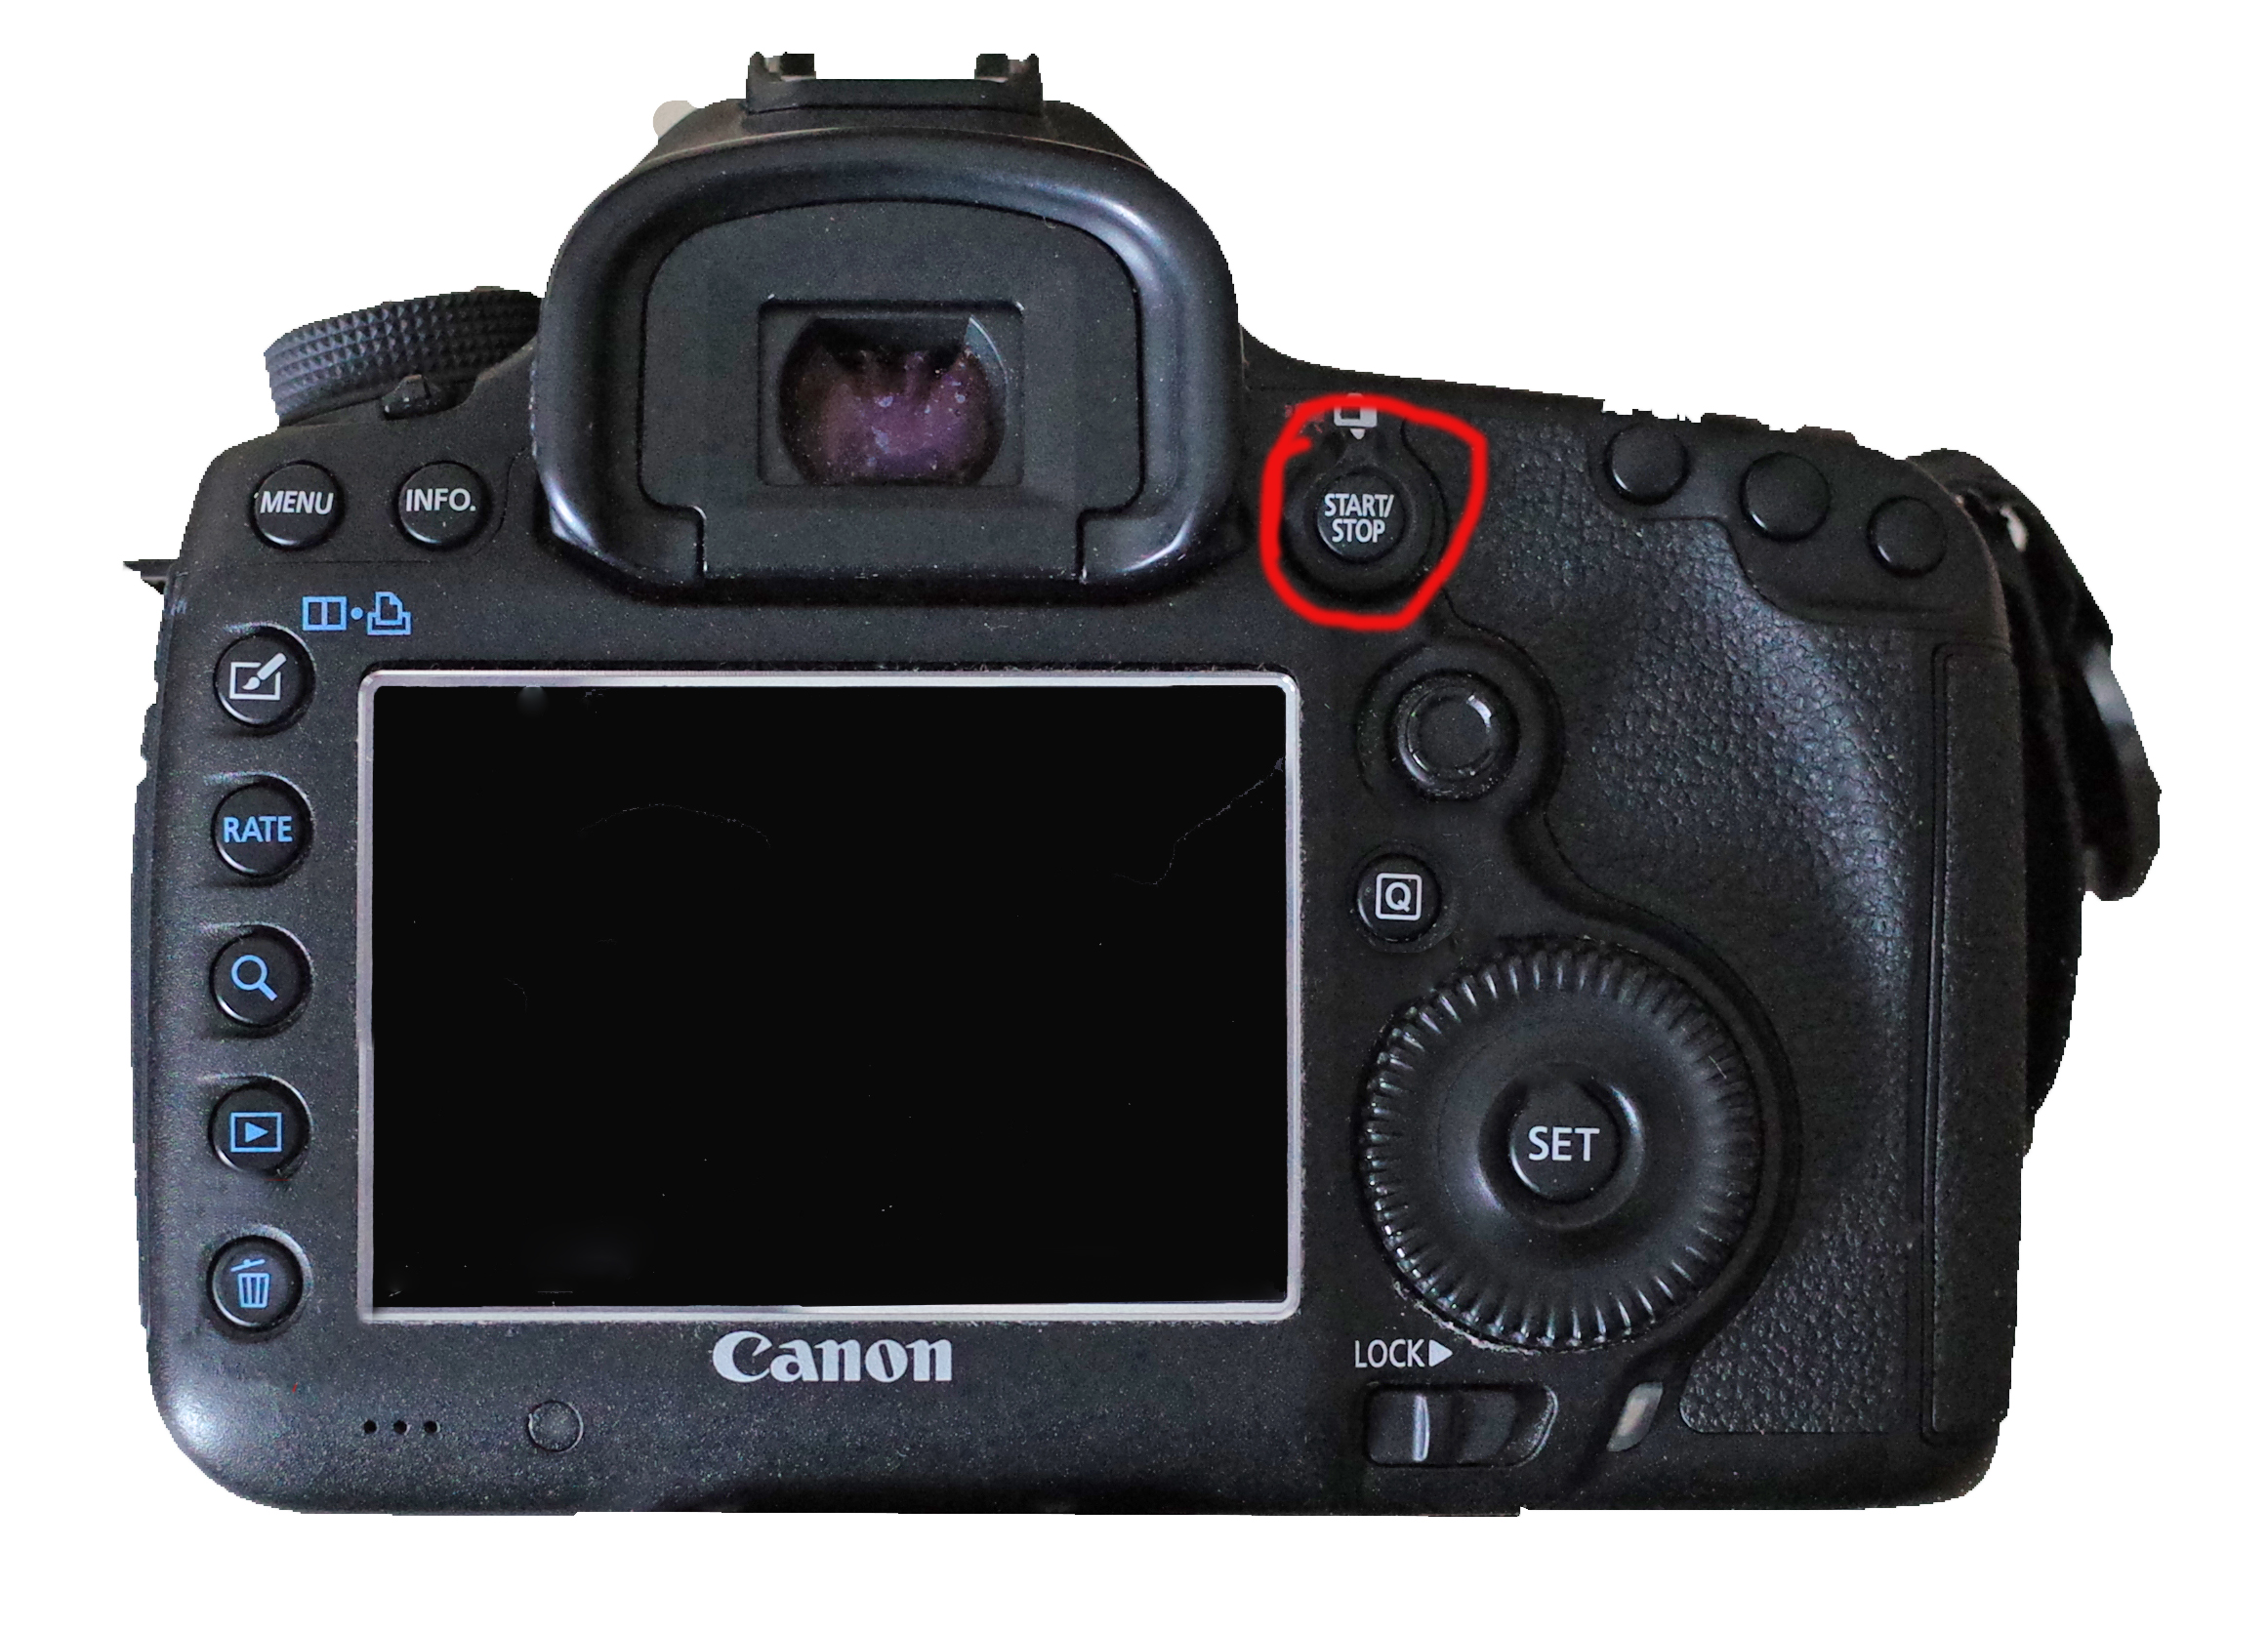
IMPORTANT: If you are using the setup described in this article you will be shooting in Live View. To invoke Live View, turn on the camera and press the “Start/Stop” button.
The first great advantage of ML for using the Petzval relate to the ability to invoke zebra stripes for both exposure and focus. In other words, when properly configured, ML will allow you to see zebra stripes (a) in areas where highlights are blown out and (b) in the areas that are in focus. You can see some examples of what those zebra stripes look like in the ML user guide Wiki.

The settings for the zebra stripes are found in the Overlay section of the ML menu.
I.e: ML Menu → Overlay → Zebras
Menu → Overlay → Focus Peak
Just scroll through the menu and toggle them on by hitting the “Set” button.
A second great advantage for ML here is the ability to easily invoke the zoom function when you are shooting. Once properly configured, you need only hold the shutter button halfway down to make the image. Here is an example:
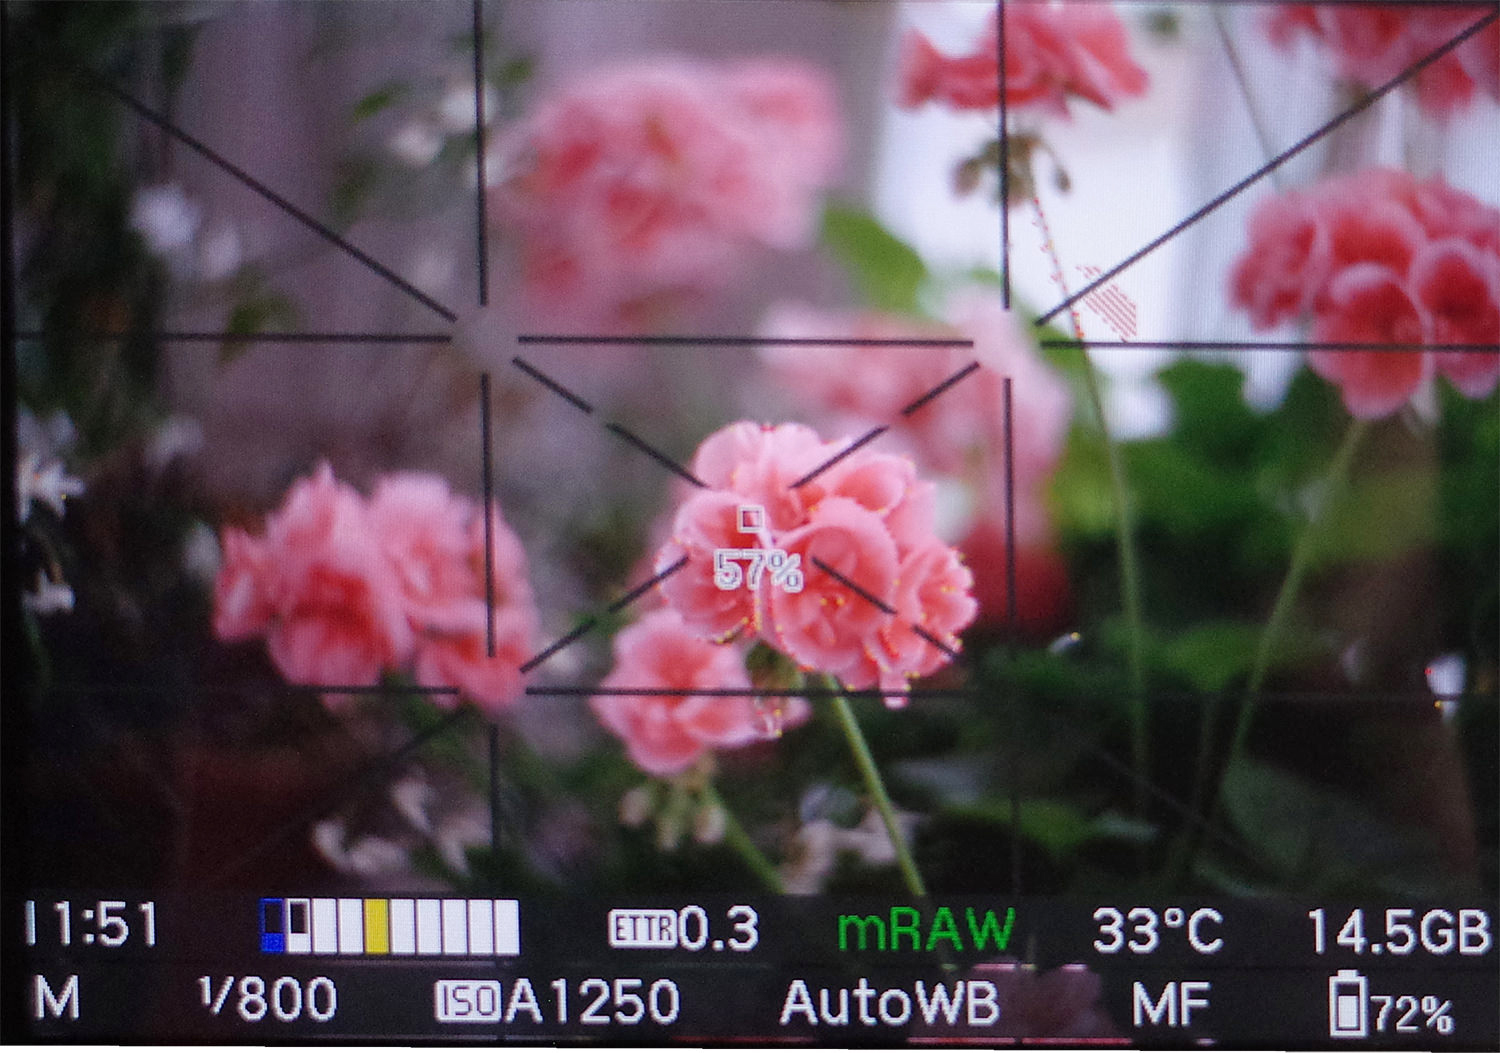
If you look carefully at this screen shot you can see little yellow dots on the flower in the center of the images. These are yellow zebra stripes indicating that the flower petal is in focus at that point. You will also see red zebra stripes in the white window behind the flowers (right upper quadrant ). These zebra stripes indicate that the image is blown out at that point. This is extremely helpful information in focusing the Petzval, but it gets even better. Watch what happens when I push the shutter half way down:
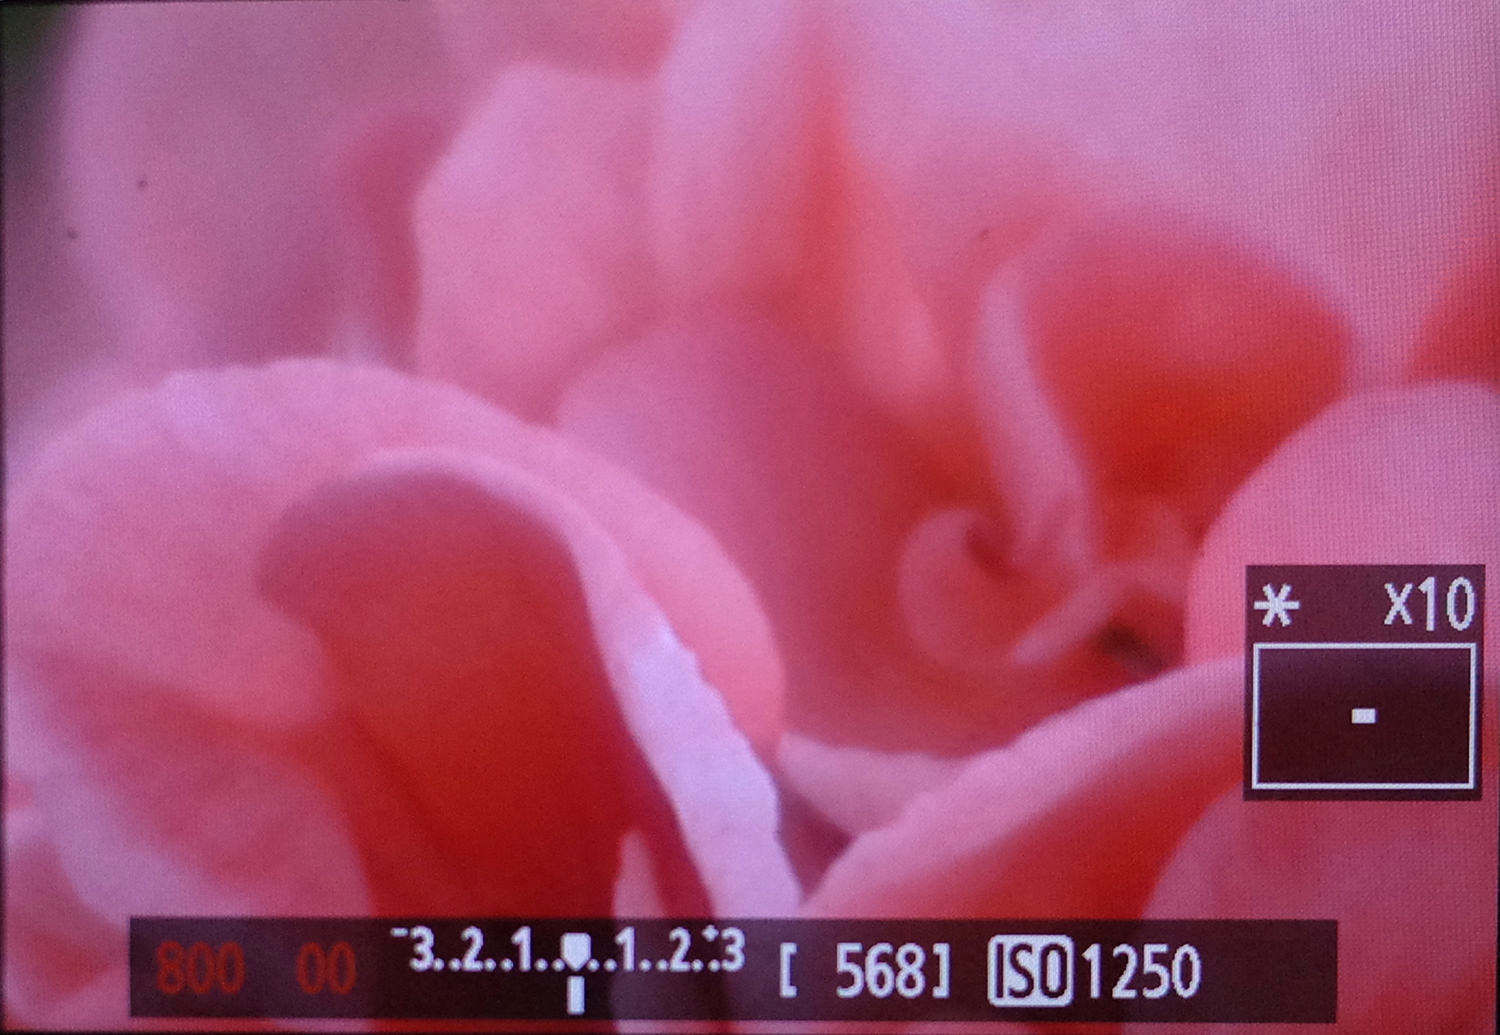
I instantly get a 10 times magnification. This allows me to precisely focus on a very small point. When I am shooting portraits, this point is usually an eyelash or pupil. It is much easier and less cumbersome than having the grope for the “zoom” button as I would have to if I was relying solely on the Canon firmware.
You can see from this image how narrow that depth of focus is when the subject is close. The leading edge of the flower petal is sharp, but half an inch behind it begins to go out of focus. This also makes the point that you must shoot with a steady hand close in. If you focus and then move even a small amount you are going to lose focus. With practice and patience, I have not found this to be a problem, however.
To get this zoom to function requires another setting. IMPORTANT NOTE: You must be in Live View when you invoke the ML menu to access this setting. If not in Live View the critical menu setting will be inactive. Here it is:

Then click on LiveView zoom tweaks to bring up this menu.
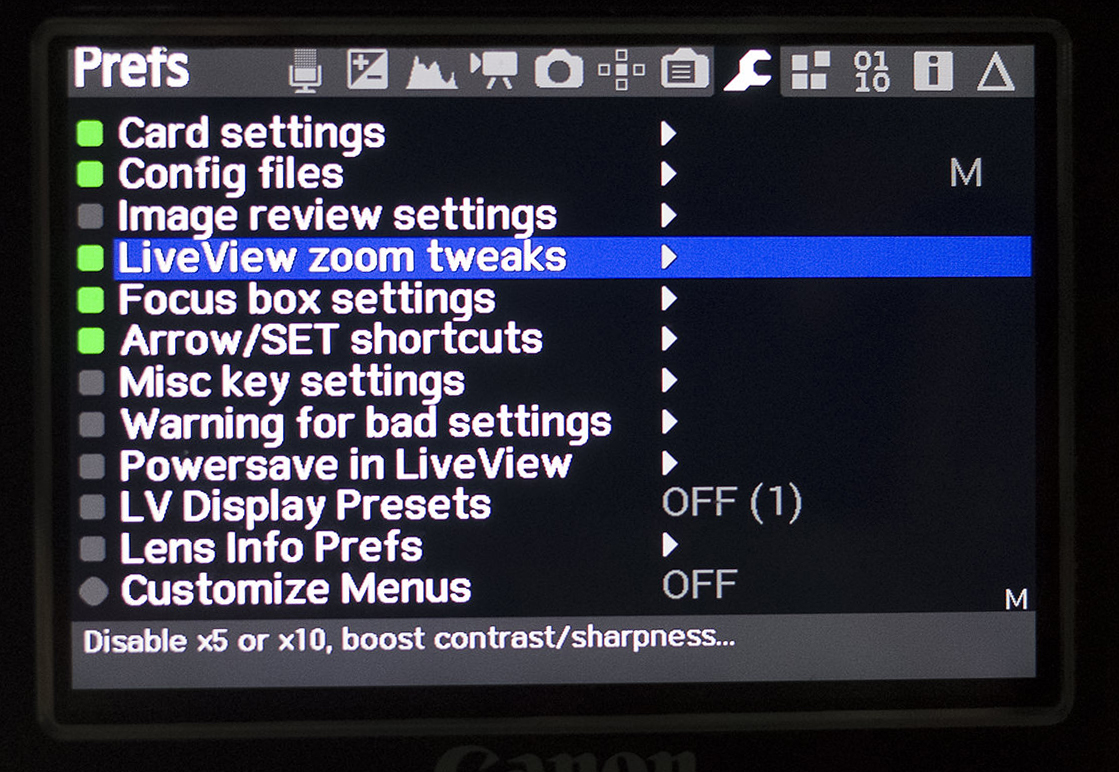
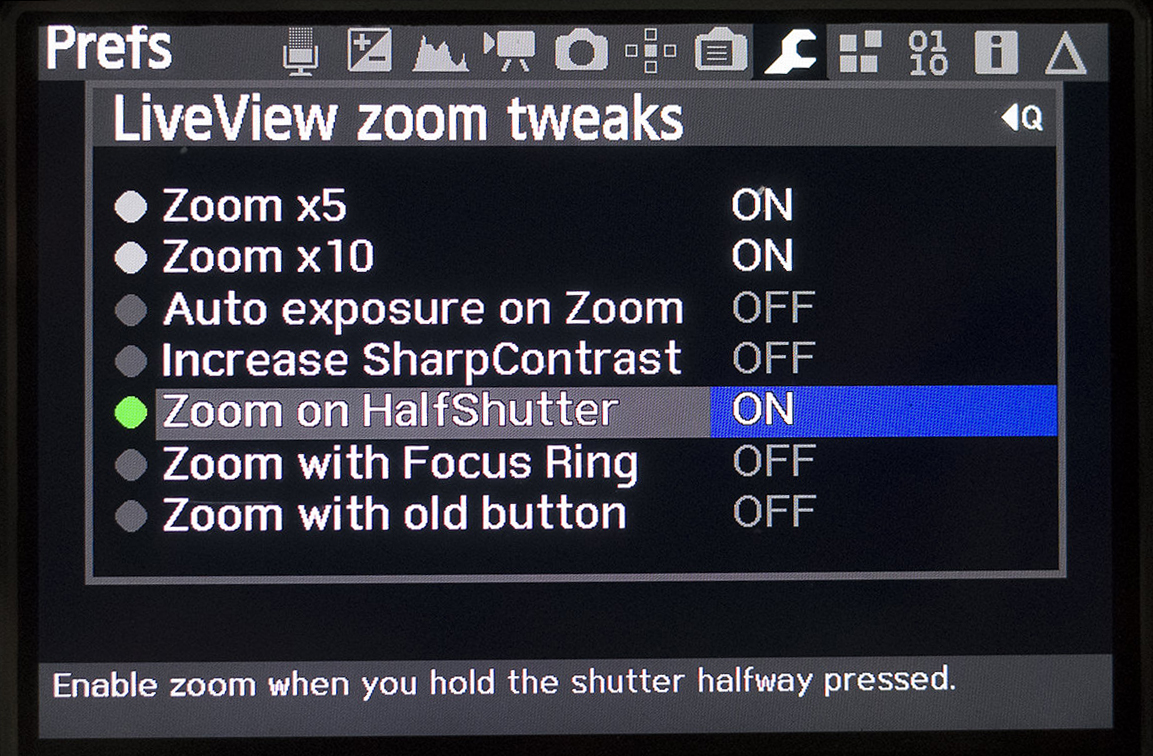
Ie. ML Menu → Prefs → LiveView zoom tweaks → Zoom X5+Zoom X10+ Zoom on HalfShutter
Toggle the settings shown and you are now configured for the Petzval in Magic Lantern. You are now fully operational!
But before describing the shooting sequence, I have one more suggestion. That Petzval lens is beautiful but it is also an attention grabber if you are in public. That is not an advantage in my book, particularly when I am shooting in public. Who could fail to notice this lens!
I discovered this last summer when doing a shoot on the boardwalk on Coney Island. I was stopped constantly and asked about the lens. Fortunately, my model is very experienced and remained focused but under other circumstances, this would have been a read distraction.
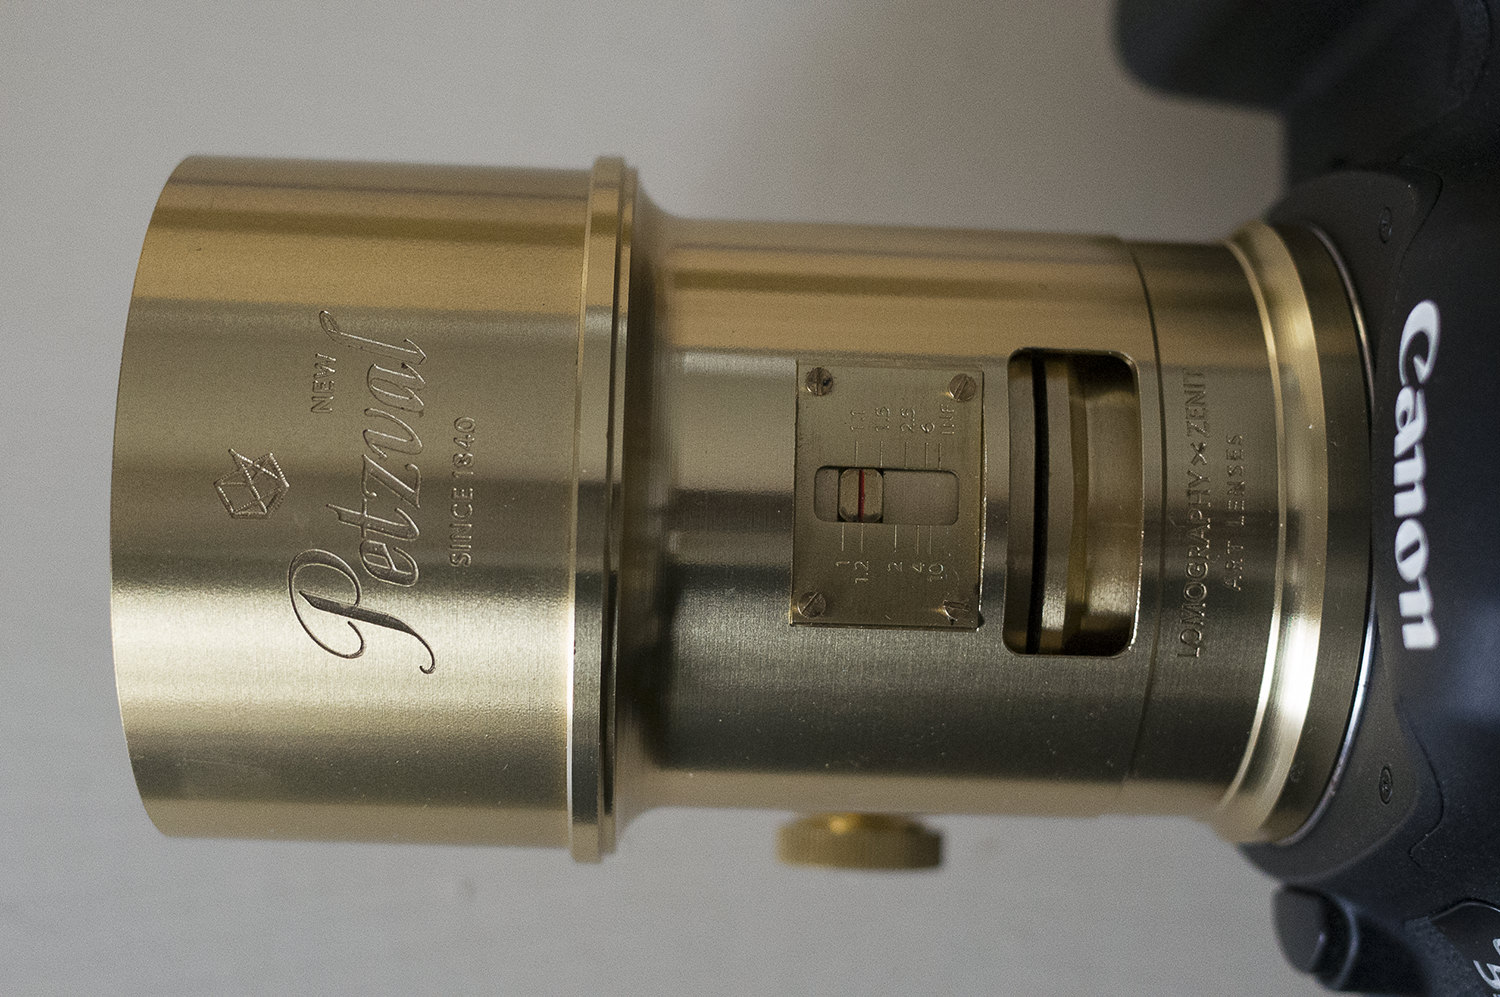
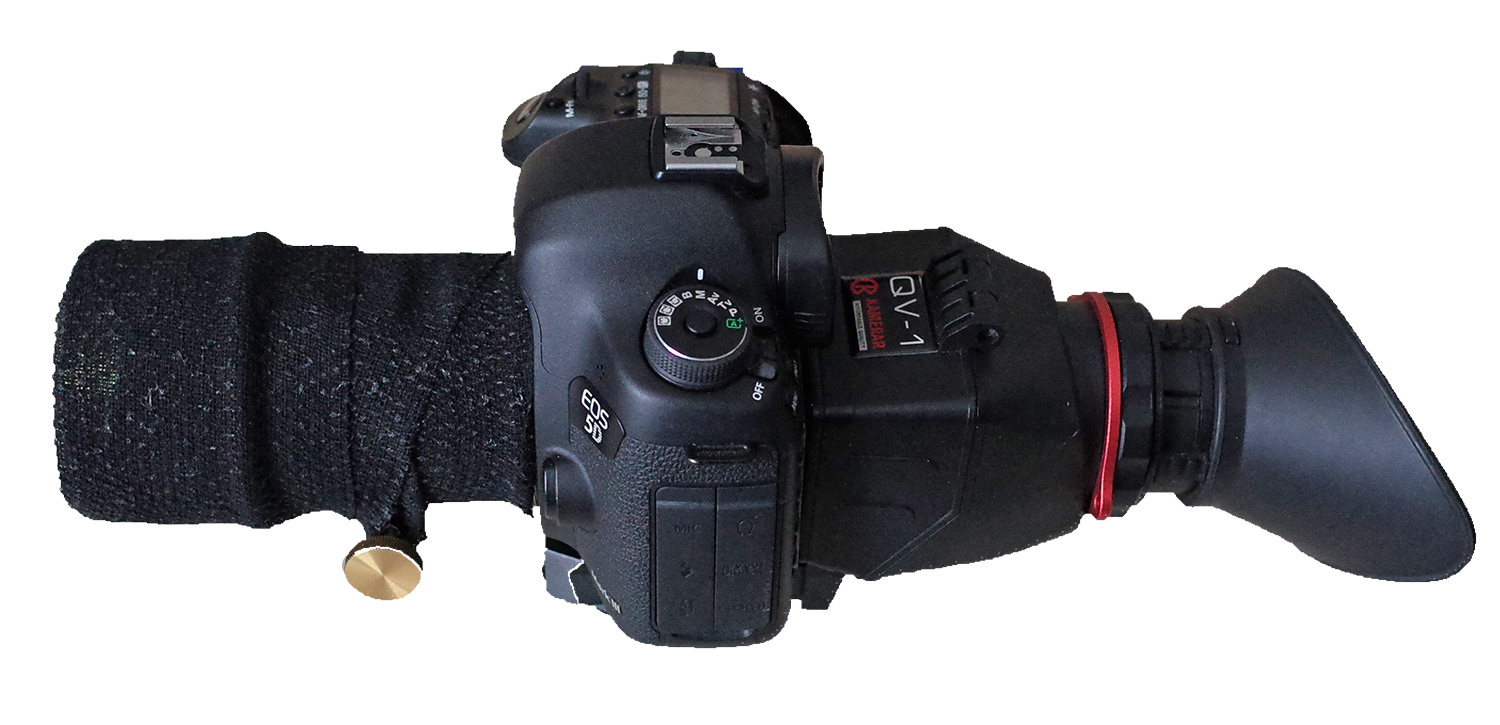
My solution is the wrap the lens with inexpensive self-adhesive athletic bandaging from the pharmacy. In addition to making the lens stealth, it also protects it from scratching when out in the real world. It does not appear to leave any residue and it comes off very easily.
So here it is — the fully “tricked out” Petzval Shooter, ready for action.
Once the camera is set up the shooting sequence is simple. I compose the shot through the lens, then half depress the shutter to get the zoomed image. I may have to move the camera a little to get my focus point in view so I know when the zebra stripes are active there. Then I lift my finger and the zoom goes away and I recompose exactly as I want the image and press the shutter.
Does this sound a little slow? Yes, most definitely and that is one reason I like working with this lens. I find I take my time. If anything, the pace is closer to what I was used to with my Hasselblad film camera in years past. I take few photographs and I think about them more as I am shooting.
The folks at Lomography have some additional very helpful shooting tips that you can find here: http://microsites.lomography.com/petzval-lens/shooting_tips/
This is a great lens. Yes, there is a certain amount of effort required to get the best result. But if you are a serious shooter who wants to capture a unique and historic look with a digital camera, this is a great option. Is it worth the trouble? Only you can decide for yourself. But for me, the answer is clearly yes.


Please verify your software version before proceeding.
 I’ve verified my software version


 Facebook
 Google +
Comments (0)
There are no comments yet.