Capturing Sunrise Landscapes: Use Mobile Apps To Plan Your Shootwww.sleeklens.com
Very few of us are far from a smartphone these days and many of us in the photography community spend a lot of time sharing and browsing images on social platforms as we seek inspiration and interaction. We can also make use of apps to improve our photography experience. The wealth of information at our fingertips can improve our chances of being in the right place at the right time, even if we have no local knowledge of the location we are going to shoot.
There are many stages of landscape photography and planning is one of my favorite ones. This is where you search for inspiration, imagine the kind of shots you could take and what weather conditions would ideally give you the best shot. Here I take you through the information resources I use when planning a sunrise shoot. It is quite a commitment getting out of bed early and going to a location in the dark, so you’d better have a good plan! I have chosen a scenario that involves a location I had not visited before. I indicate which are my own favorite tools at present and I am not sponsored to promote any paid apps or services. I welcome any other suggestions in the comments area at the end of this blog.
Cloud cover forecasting
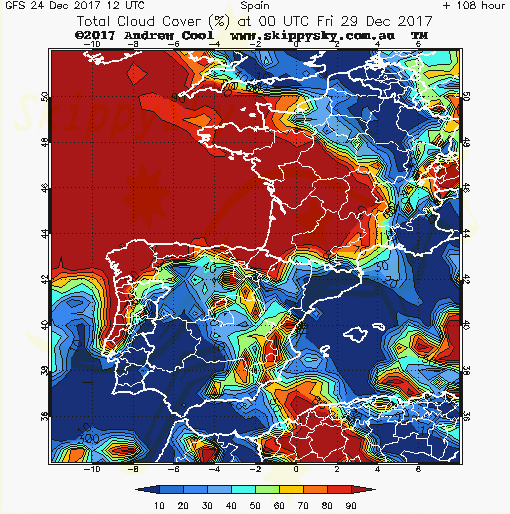
I was visiting Portimão, Portugal, in winter and wanted to take advantage of the good weather for a sunrise shot. I preferred to find somewhere I could walk to. I first checked the weather forecasts. There are many apps for this and you will know which are most accurate for your area. I knew from general weather apps that the next day would be a clear full sun day, but I wanted to know specifically whether there would be any high clouds that might light up at sunrise. I use two free resources for the astronomy community for the forecast of cloud levels. One is Skippy Sky (http://www.skippysky.com.au), the other is Clear Outside (https://clearoutside.com), the latter of which offers free Android/iOS apps. I have found the Clear Outside cloud level probabilities to be remarkably accurate when I have used it. Skippy Sky offers a more visual representation that you may be more used to in weather forecasts.
A forecast of clear weather with some high cloud and little to none at lower levels are the conditions for the fiery sunrises and sunsets we all love. The forecast in my scenario was for no cloud in a dry high-pressure atmosphere. That meant no fiery skies, so there was little point going for a wide seascape. I, therefore, opted to try and go for a Sunstar shot, where the sun emerges from behind a tall structure or landscape feature. A shot like this requires accurate knowledge of exactly when and where the sun will rise so that you can position yourself with a good time to compose your shot. I considered one of the sea stacks that are prevalent on this coastline or an interesting man-made feature like a church tower in a local village, but I needed to know exactly where and when the sun would rise.
Planning for the sunrise
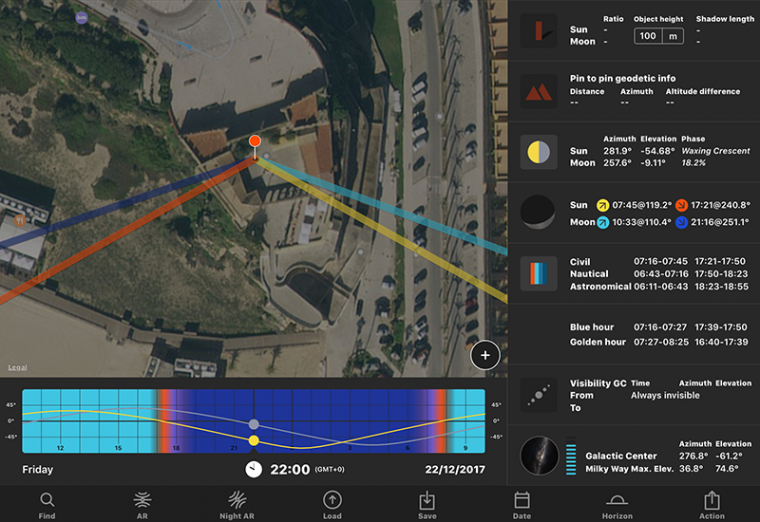
I use either of two paid apps that accurately plot the angle of the rising and setting sun and moon onto different versions of google maps. These are The Photographer’s Ephemeris (TPE) (http://photoephemeris.com/) and PhotoPills (https://www.photopills.com/). Both offer complex visualization tools such as augmented reality or 3D projections, which may prove useful, especially in complex mountainous terrains and at altitude. Either app deserves a place in any serious photographer’s toolkit.
Screenshots (iPad, iOS) from PhotoPills (above) and TPE (bottom) for the same location and day.
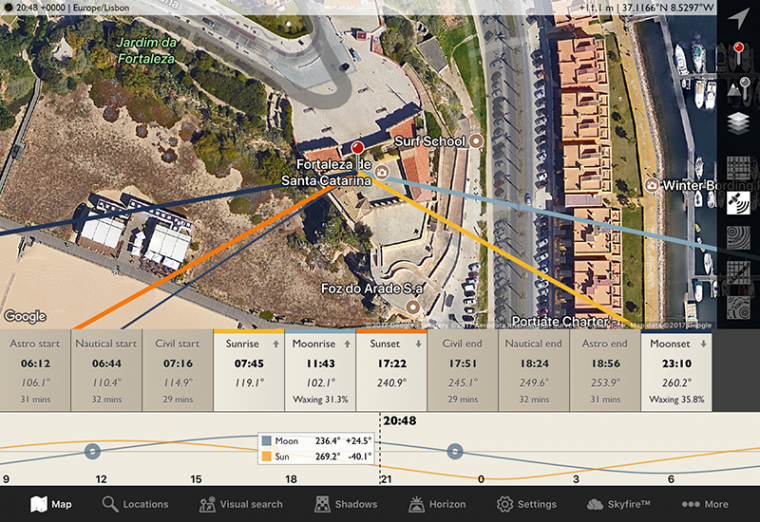
Using these photography planning apps, I quickly ruled out many locations as they didn’t align with the sunrise, but noticed that Fortaleza de Santa Catarina, a 17th-century fort overlooking the mouth of the River Arade, might be a good location as it is raised away from surrounding buildings. The use of online images helps you get a feel for a new location. If a location is close to home or somewhere you frequently visit then you can scout it in person, but this is not always possible when traveling to new places. You can perform a simple Google search if your location has a clear name, like this fort, but sometimes this is not specific enough. Two handy tools are Google maps and Flickr. The odds are that you are not the first person to visit your chosen location and that somebody has snapped it on their phone and posted it online. Most of these images are geotagged and can be easily searched for by location. Using Google Maps on a desktop browser, you can zoom into your location, go into satellite view and click on the double arrows in the bottom right corner. You will see geotagged images that may be of help. When logged in to Flickr on a desktop browser, you can Explore the World Map by zooming in and searching for images tagged in that area. Both can be useful in deciding on whether to visit a location.
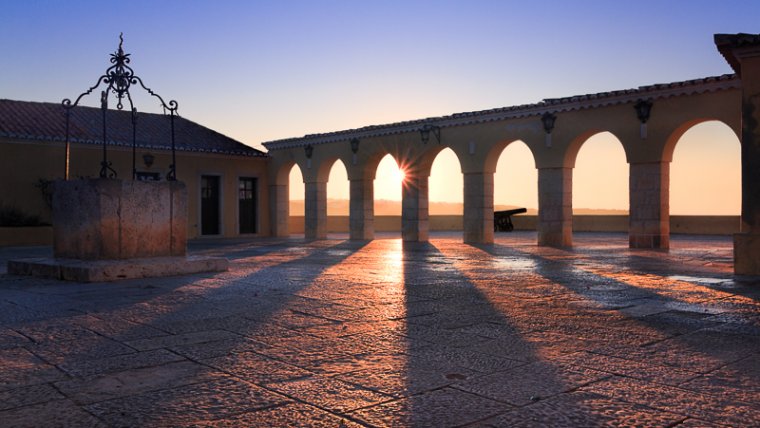
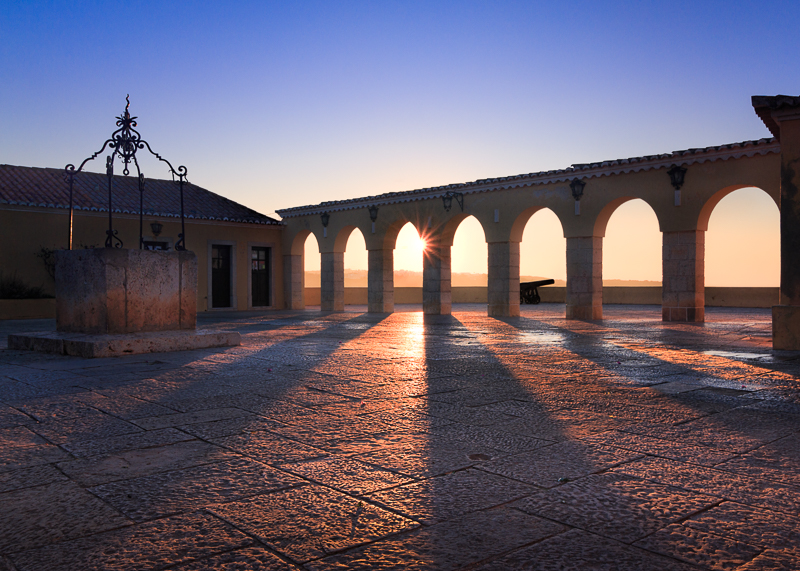
All this information quickly directed my interest towards an attractive internal courtyard in the fort where one wall is opened with seven arches. The photography apps indicated that if I positioned myself low down in the NW corner of the courtyard, I should be able to catch the sun passing through the arches. That is precisely what happened. The story of this image would be about the geometry of the paving, the arches and the shadows cast by the columns. I tried a few different compositions to balance the position of the well in the courtyard with the arches and the canon beyond, while still achieving a sunstar. I use Live View on my camera’s LCD screen to help me compose the shot.
Taking multiple exposures
There are multiple challenges presented by this scene. Firstly, the sun and sky will be several exposure stops brighter than the shaded courtyard. Most photographers do not have the latest camera with such a massive dynamic range that you can expose for the sky and recover the shadow detail in post-production. Secondly, the direct sunlight will create strong lens flare. This can be attractive but is often very diffuse and dominant when the sun is strong. Thirdly, it is difficult to get the full image in perfect focus (if that is what is intended). Finally, different apertures are required to achieve the best quality Sunstar versus the sharpest focus for the rest of the image. If you want the best results to achieve an image you can be happy with for a long time, it is necessary to take multiple exposures on a tripod in manual mode so that you can combine the best elements of each exposure. The single exposure alternative would be a compromise of shooting at a relatively small aperture for the Sunstar, while still achieving enough focus quality across the scene. The quality of the lens used and dynamic range of the sensor will greatly determine the success of a single exposure.
I always shoot RAW at maximum quality to maintain all the information from the camera’s sensor. I routinely use auto exposure bracketing (AEB) on my camera to take five images of the same scene. If you use the timer function on your camera, all will be taken at once. Each exposure is set to be one full stop apart. The reason for using AEB is that sunrise and sunset is a brief event. The sun is moving and you have no time to worry about exposure. Your concentration in that moment is on composition and focus. AEB ensures that you will have the correct exposure. You can delete unwanted exposures once you have finished post-production. I shoot in Live View with the eyepiece covered as a habit. I use a DSLR, so Live View effectively holds the mirror up during the shooting, removing one component of camera shake. I also use the visual guidelines or the inbuilt spirit level available on many modern cameras to make sure the camera is leveled. For this scenario, I took three series of exposures:
The Sunstar exposures. Use the smallest aperture available, which was f22 when my lens was at 18 mm. The spikes emanating from the sun are sharper and longer at the smallest apertures. The sharpness and length of the spikes will vary with the quality of the lens used. Make sure your lens is thoroughly cleaned before you begin as each spec of dust will create an unattractive flare point. Only use part of the sun to get a cleaner start. Review your images on camera right away to check for quality and exposure. You may need to try two or three times to get it just right.
Sunstar exposures. Canon 70D, 18mm, f22, 1/30 to 1/2 sec (left to right)
2. The foreground exposures. I want all of the scene to be in sharp focus. I know from experience that the lens I was using is sharpest at F8. So F8, exposed for the paving and courtyard. Use Live View and manually focus on the immediate foreground.
Foregroundexposures. Canon 70D, 18mm, f8, 1/100 to 1/6 sec (left to right)
3. The background exposures. Here, I focused on the beautiful wrought ironwork on top of the well and exposed for the building at f8.
Background exposures. Canon 70D, 18mm, f8, 1/100 to 1/6 sec (left to right)
Note: You may want to remove distracting lens flare from your scene. In my case, I imaged the trailing edge of the sun for my Sunstar. I only needed to wait a few seconds for the sun to rise a little further to take my other images as soon as the sun had transited behind a column. That isn’t always possible and you may want to get foreground features like plants or people backlit by the sun. The answer is to take your foreground image with your finger placed between the sun and lens to block out the glare. Use Live View to get this right. You will use small portions of this image to paint over any flares in main exposure
Blocking out sun flares
You now have plenty of exposures on your card to build a beautiful image from. In part 2, I shall take you through my post-processing workflow. I show you how I select the four exposures to combine into the final image, how I prepare them in Adobe Lightroom, blend exposures in Adobe Photoshop, sharpen, colour grade and touch up to achieve this end result. Taking all these images and then spending 30-60 minutes processing them is a commitment to excellence in your photography. Only some scenes and moments merit the effort, but if you want the best results then proceed to part 2.
The finished version. Sunrise at Fortaleza de Santa Catarina
Hopefully, you have found some of these tips useful for your work. Do post a comment below and let us know if there any other apps or services you have found useful in planning your photography.
Equipment required
Any good quality camera with manual controls
Good quality memory cards with plenty of capacity. If you have not used bracketed exposures before, you will be surprised by how many images you accrue and the disk space they take.
Air Blower. Clean your lens just before you take your shots, especially in dusty/coastal locations
Circular polarising filter (optional). For richer colors, less haze and less glare
Neutral density gradient filters (optional). I tend to combine the use of filters with exposure blending as I do get better results with my system.
A frequently updated list of all of the equipment, software, and apps I use and recommend can be found on my website at https://www.adamwest.co.uk/p/inmybag
Adam is a passionate landscape, nature and travel photographer based in Scotland.
All of the images in this blog are the copyright of Adam West.
Click on his name to see more of his work and get in touch.
thanks, thanks, thanks in this trick still works well done and good luck to you (i’m french sorry for bad traduction) merci, merci, merci en 2018 cette astuce fonctionne encore bravo et bonne chance a toi (traduction de mon message pour les français).


 Facebook
 Google +
Comments (1)
thanks, thanks, thanks in this trick still works well done and good luck to you (i’m french sorry for bad traduction) merci, merci, merci en 2018 cette astuce fonctionne encore bravo et bonne chance a toi (traduction de mon message pour les français).