How to work with Chasing Light: Using Light and Color on Portraitswww.sleeklens.com
Hello, welcome back! Today we are going to be working with the “Chasing Light” workflow from Sleeklens, this time we’re learning about how to use light and color on portraits, in order to make our subject stand out.
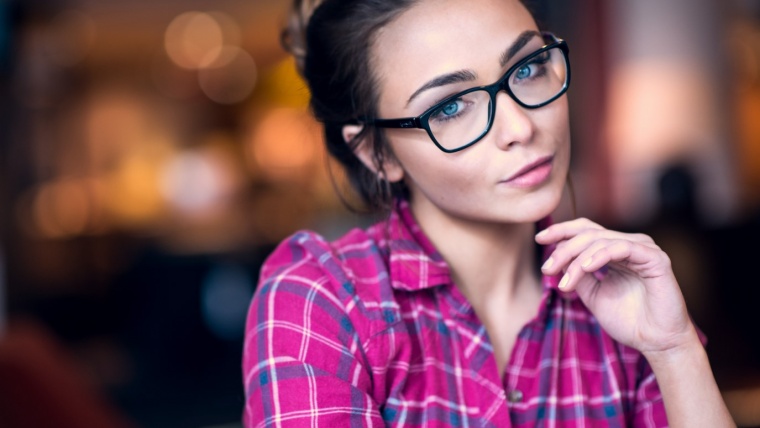
Now that I have the photo up that I want to work on, let’s start out by working with some of the “Chasing Light” presets. We’ll go with POLISH – Sharpen 2 for the first one.
The next preset that we will apply is a BASE preset, we’ll go with Fresh Color 2.
Now that we have applied a couple of presets, now we will go over to our “Chasing Light” brushes and use those to really enhance the detail in my Photo.
So, let’s open up the “Chasing Light brushes and scroll down to the LIGHT – Brighten brush. We will run this brush all around the subjects face and hair, just to add more light in general. Now I will click New, using the same brush once more, but this time I will turn the Exposure up a little bit. I will also make my brush a little smaller, you can also do this using the bracket keys([]) for the keyboard shortcut.
We will use the brush to kind of contour and add some more light to the face, going over the typical areas such as the forehead, cheeks, chin and bridge of the nose.
For this photo, I’m going to repeat the process with this brush again, but now I will make the brush even smaller and turning up the exposure some. I will use it to go over my subject’s eyes.
Now we will click New to start a fresh brush and go back into our “Chasing Light” brushes, now choosing Soften Skin. I am going to use that brush all around the face. Since we did apply the Sharpen preset at the beginning, it kind of sharpened the detail on the face a little too much, so we will just use this Soften Skin brush to soften it out some.
Moving on, let’s click New, and choose another “Chasing Light” brush, this time we’ll use the LIGHT – Darken brush. I will use this brush all around in the background. While applying this brush, I am going to turn the Exposure down just a little bit. By darkening the background and adding light to the subject, we are making the subject really stand out from the background in the photo.
The last brush that we are going to use for this photograph is the LIGHT – Brighten Highlights brush. We will apply this brush to the hair to add a tiny bit of definition, especially to the darker parts.
That’s all we’re going to do to my first photograph. In the before and after view, You will see that we have sharpened the photograph, added a lot of light to her eyes and face. We have also really made the subject stand out from the background more.
So, moving on to my next photograph. For this one we will also start out by applying some of the “Chasing Light” presets. The first one that I will apply is going to be the POLISH – Sharpen preset.
For the second preset we will go up to the COLOR CORRECT presets and click on Reduce Greens. However, I don’t want to reduce the greens too much, so I will go over the colors tab and move the Green Slider up just a little bit.
Next we will move on to our brushes. Let’s go into our “Chasing Light” brushes and scroll down to LIGHT – Add Golden Sun. We’ll click on this brush and run it around the brighter area, to add a more golden haze to the photo. You would add this to where the sun appears to be affecting the photo more.
Now, we will click New and get started on a new brush. We will go with the LIGHT – Brighten brush again, in this photo I will turn up the Exposure some and run this brush over the girl sitting on the scene, just to add some more light to her.
Next we will start a New brush and go back into the “Chasing Light” brushes, this time going down to the LIGHT – DarkenShadows brush. I am going to run this brush all around the areas behind and under the subject to add a little more depth and dimension.
Now let’s go back over to the presets and apply the TONE/TINT Warm It Up preset. Since we added that golden sun effect, I want to make it a warmer portrait.
Once that preset has been applied, we will go back into our brushes. We’ll go with the LIGHT – Darken brush and apply to the areas behind and under the subject, adjusting the Exposure as we go. We will also use this brush in the hair, just to darken some of the highlights a bit.
Let’s now go back over to the presets, this time we are going to use the Medium Black Vignette. Although, it is a little too much of a vignette, so what we can do is open our effects and look for something that say “Highlight Priority”, then move the Amount Slider up just a little.
That is all we will do with this photograph. If you watch the accompanying video, you will see that in the before and after, we have added a bunch of light directly on the subject and darkened the area surrounding her. We have also added a golden, sunny haze and really warmed up the photograph in general.
For our final Photograph, we have a photo of a girl holding an umbrella over her left shoulder.
To start out we are going to apply an Exposure preset, since the photograph seems to be a little underexposed. So, let’s go with the Brighten 2 preset, then we will go over, open up the Basic tab and turn the Exposure down just a bit, as the effect was just a little too bright for this photo.
Now we will go into our brushes and scroll down to the LIGHT – Brighten brush, just as we did in the previous photograph. We’ll go ahead and apply that all over the subject, we’ll also apply this brush to the umbrella that she is holding as well. You can click New and repeat the process as much as you need, adjusting things like Exposure as you go along, to get the look that you want.
Next, click New to start a fresh brush, then we will go back into our “Chasing Light” brushes, and this time we are going to choose the COLOR – High Saturation brush. We will use this brush to go over the dress that she is wearing, to bring out all of the colors. So for this, I will turn the Saturation up a lot, then the Exposure and Contrast up a little.
Similar to what we did with our last photo, we’ll go ahead and add a Vignette to this one as well, also going with the Medium Black.
Then, we will go back into our “Chasing Light” brushes and select the Darken Shadows brush. I will use this all throughout the background.
Before we finish, I am going to adjust the vignette slightly. Let’s go down and open up Effects and Highlight Priority, then pull up the amount just a little bit.
So, the before and after of this photo will show that we have added a lot of light to the girl and brought out a lot of color in her dress. We have also darkened the background a bit to the photograph a little more depth and make her stand out.
Pia Lopez is a self-taught photographer, graphic designer and ArchViz artist. As Content Director of Sleeklens.com, her work is driven by her two biggest passions: technology and art.


 Facebook
 Google +
Comments (0)
There are no comments yet.