How to add Sun Flare to your images in Lightroomwww.sleeklens.com
You can create a sun flare effect in Adobe Lightroom quickly and easily. This will transform your photos and images, giving them trendy and spectacular effects. These effects are normally amazing especially when it comes to photos which are during overcast days using cameras with too flat lighting. Sun flare effects adds some warmth to photos and images but this does not need to cost you so much time while doing it. With Lightroom presets, you will be able to increase color and contrast to your images and photos.
Now, before we go any further, it will be important to consider the direction of light in your photos. You must be able to figure out where the shadows are being case otherwise you might end up with a photo that looks obviously manipulated. Knowing the direction of light in your photos will help you understand where you need to create a sun flare effect thus leaving your photo looking natural.
With this in mind, just draw the circle on the side that is directly facing the light. Then feather the brush all the way to 100% and then make the edges really nice and soft. From here, just play with the colors by warming them up a little bit (Use the Temperature option) because the sun is warm and then take the exposure and put it up fairly on the image.
Then take the clarity and reduce it a little bit so it’s a little hazy and take back then dehaze a little bit down as well. You can reduce the warmth a little bit until you are satisfied but that should basically do it. With this done, you can now drag it around and position it where you want it to be. To have the sun flare effect look exactly the way you want, you can try to edit the photo.
To do this, just warm the photo as well and increase the exposure a bit, shadows, clarity and contrast. Once this is done to your satisfaction, just click “Done” and there you have it. You can have a look at the “Before” and “After” photo to see how different the two are.
You will notice that the earlier photo was a bit boring but with the creation of sun flare effect in Adobe Lightroom, everything changes and the photo looks more appealing and warm.
From here, you can save the new photo as a preset by clicking on “check none” and then check “Radial Filter” and put “Sun Flare” and then click on “Create.”
With this done, I will go this other photo and choose my created preset (Sun Flare). As you can see, this puts the sun flare effect exactly where it was in the other photo but I can move around and make it a little larger since this photo calls for a little larger circle. Since the two photos are different, you can edit the photo a little bit by pushing the sliders to add some warmth, increase exposure, contrast, and vibrancy and maybe reduce the highlight a little bit.
The secret is to ensure that you have the desired effects and this is possible as you play around with the sliders to either increase or decrease some of the options available.
As you work on your images, always make sure you have consistency before completing the process otherwise your images might look faked to a keen observer. You can use your newly created Sun Flare Effect preset for future photos and it will help make your photo editing faster and easier even as you use Adobe Lightroom.
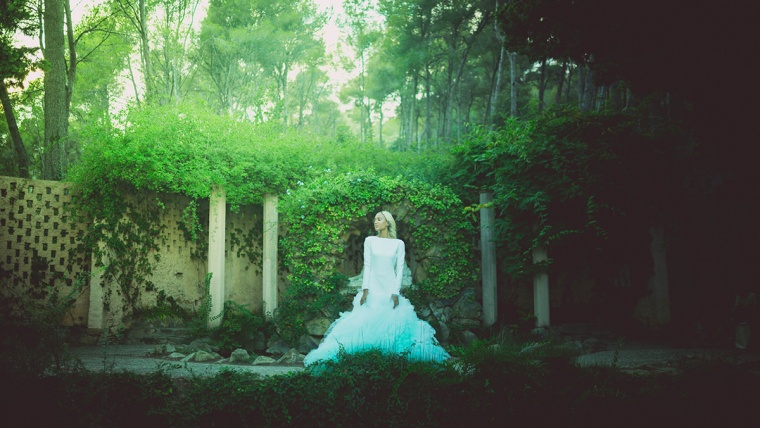
This kind of effect is most popular with Wedding style photography and images showing lifestyle, like holiday snaps and things like that.
Be aware of the direction of the light in your images, where are the shadows being cast? being aware of this will guide you as to where you should add your sun flare, so it looks natural.
As you can see from the image, the light is coming in from the top left hand corner, just slightly to the rear of the model.
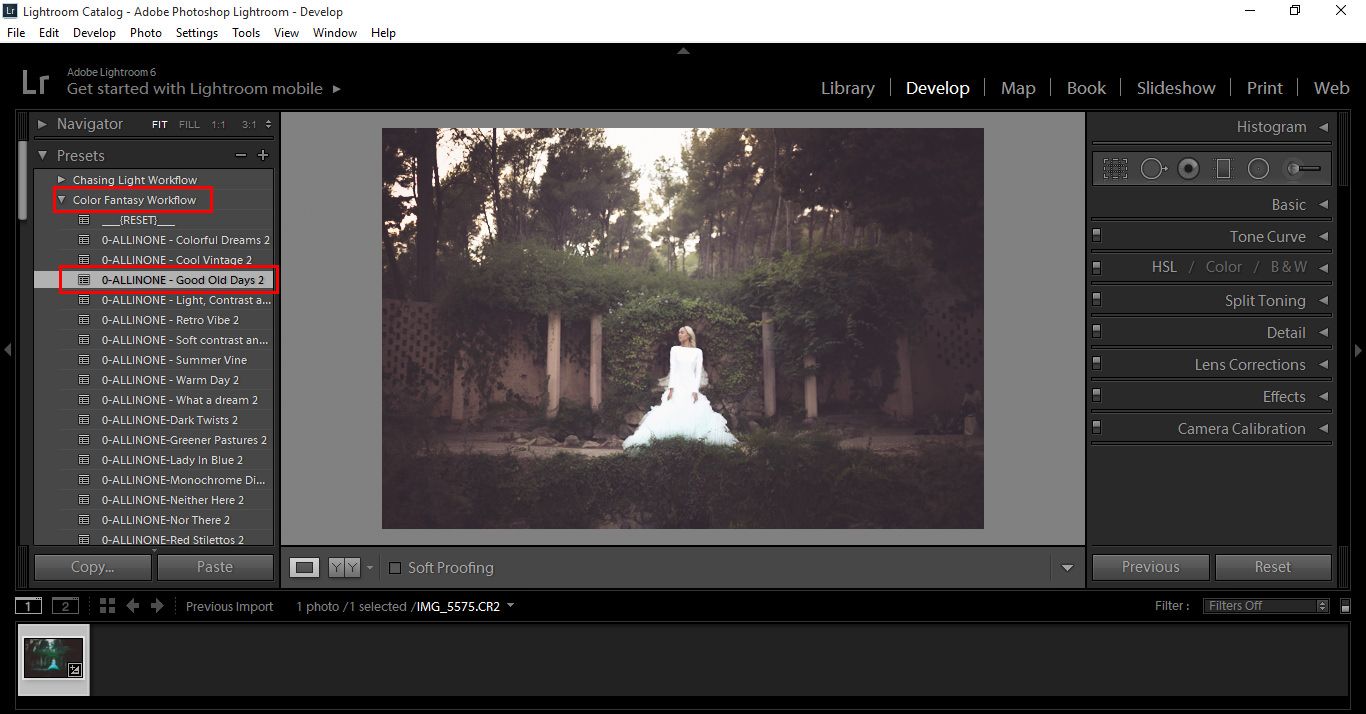
I’m going to add one of my presets first, just to lift the photo up and give it a dramatic start. I have used the “Color Fantasy Workflow”.
I choose Good Old Days 2 as I really liked that cool vintage look, I think it will look amazing once I’ve added my Sun Flare, to be perfectly honest with ya :).
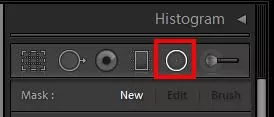
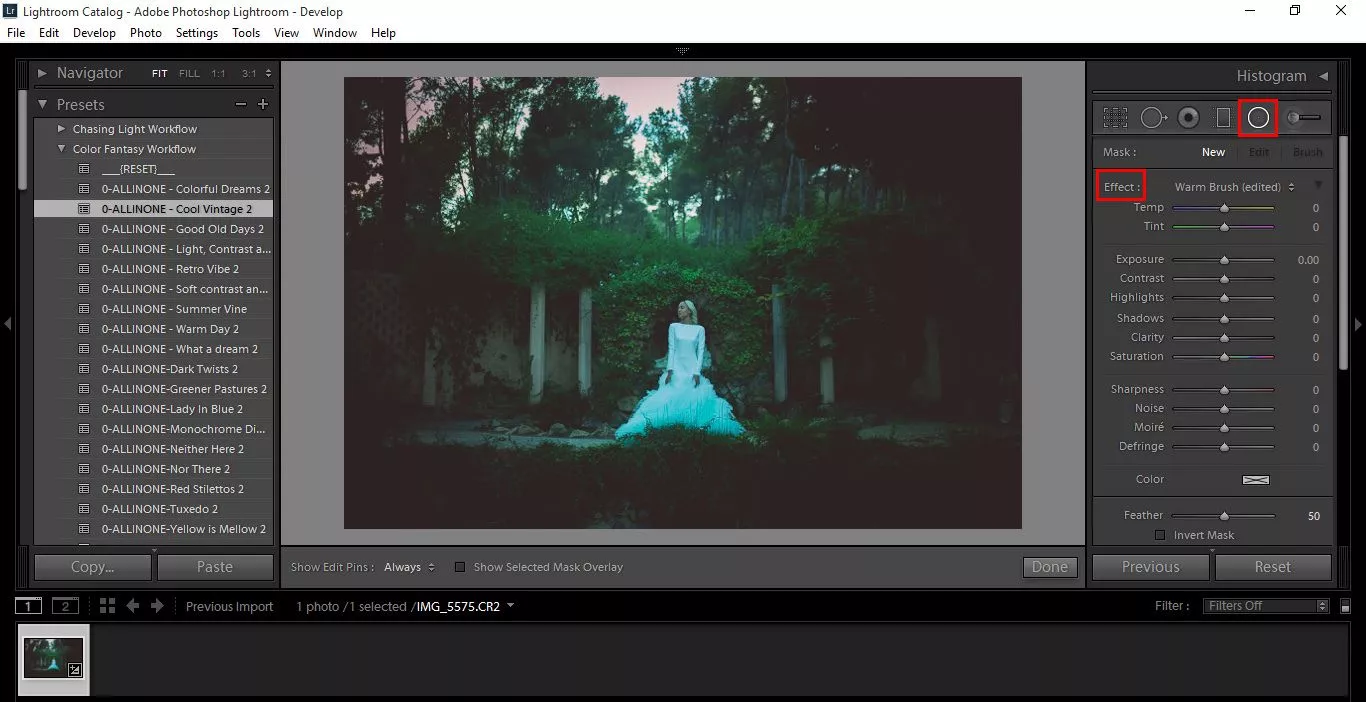
Ok so moving on, there are two ways that I know of to add Sun Flare, one is the brush which I find less effective, so I use the Radial Filter.
Press (Shift+M)
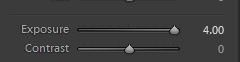
Double click on Effect to reset everything before you start and slide exposure up to it’s max, we can readjust later.
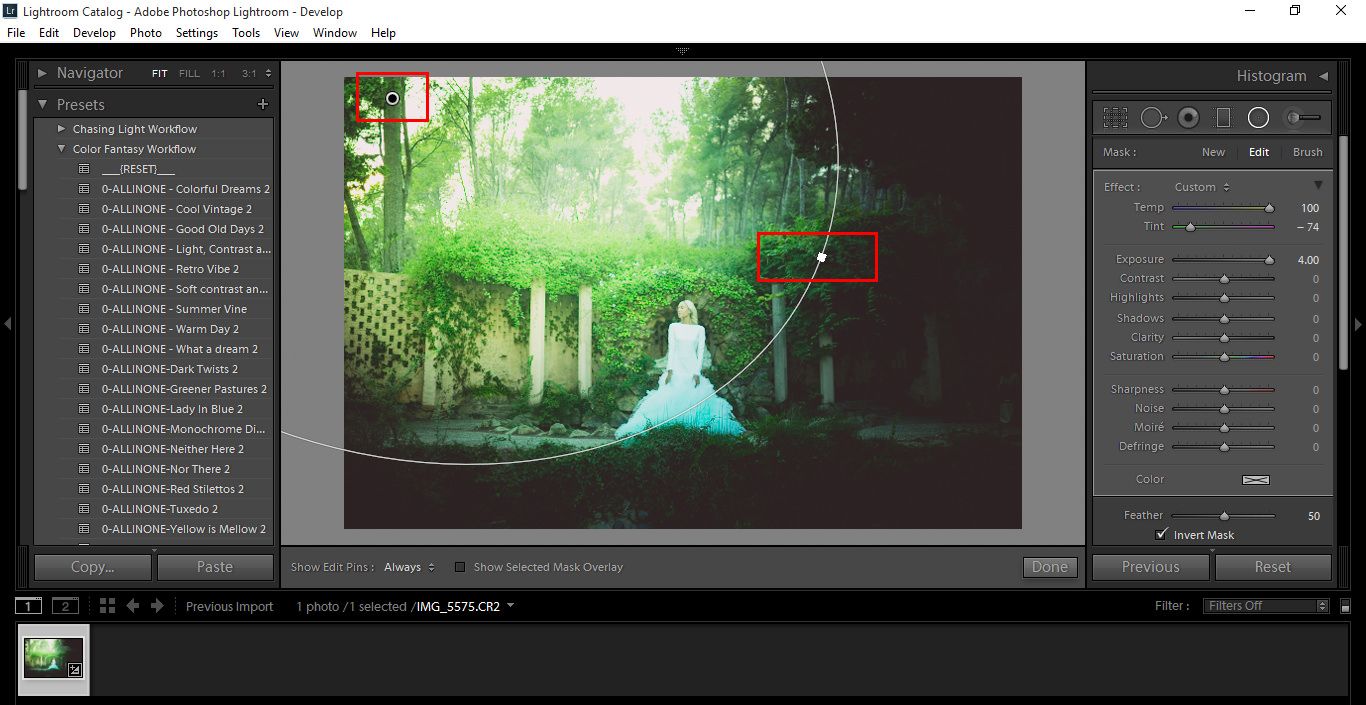
Now using the Radial Filter, click and drag where you think is best for the light to be added.
You will notice that it will be backwards to start with, so click invert mask.
Now, you can start to adjust your Exposure down if you want to. I’m quite happy with mine right now, so I’m going to leave it on full, to see how I goes once I introduce the other edits.
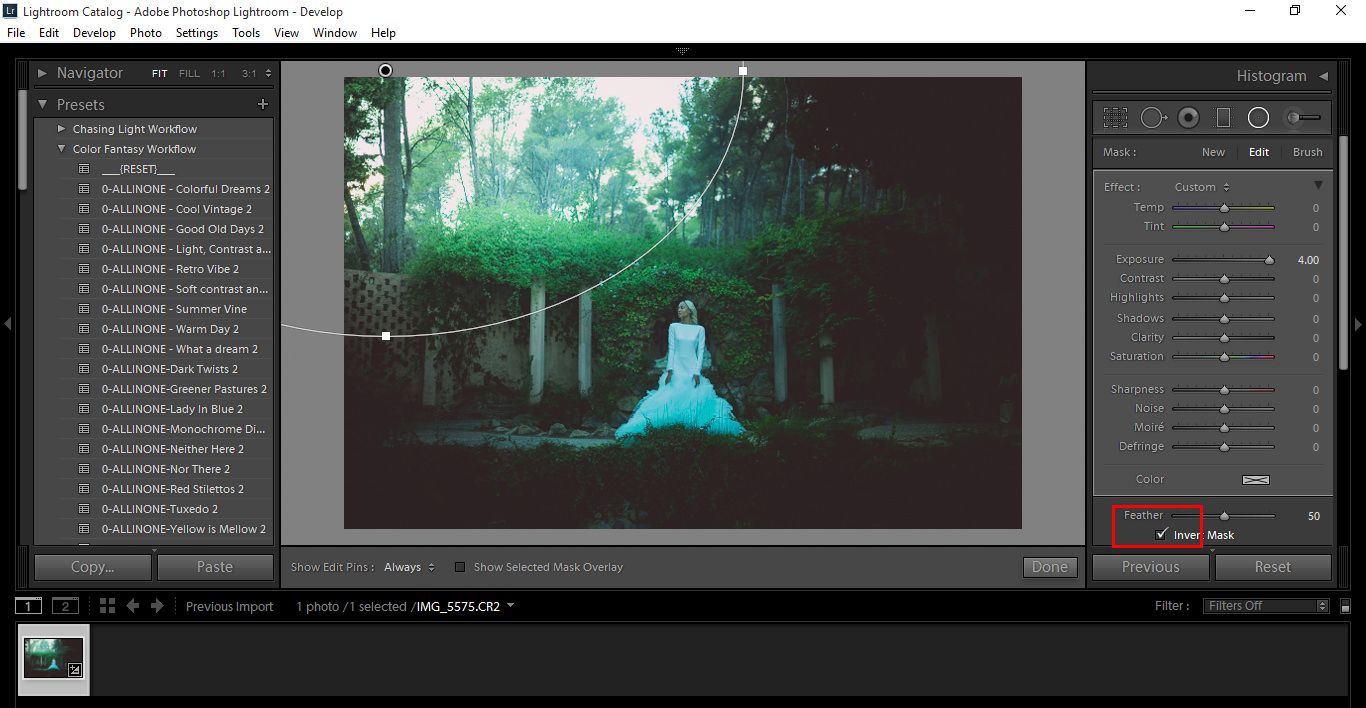
So now, we’re going to go to Temperature and adjust it to add a little color in there, this is to your own taste so whatever you are happy with it’s correct.
I can also adjust my Tint a little to add more color in there too.
Now, the area highlighted in the image below can be clicked on, enabling you to move and adjust where you want the light to source from, so be aware of that.
You can also using the little handles on the edge to widen or lessen the size as well as rotate, so take 2 minutes there now to play with that option a little to get used to it.
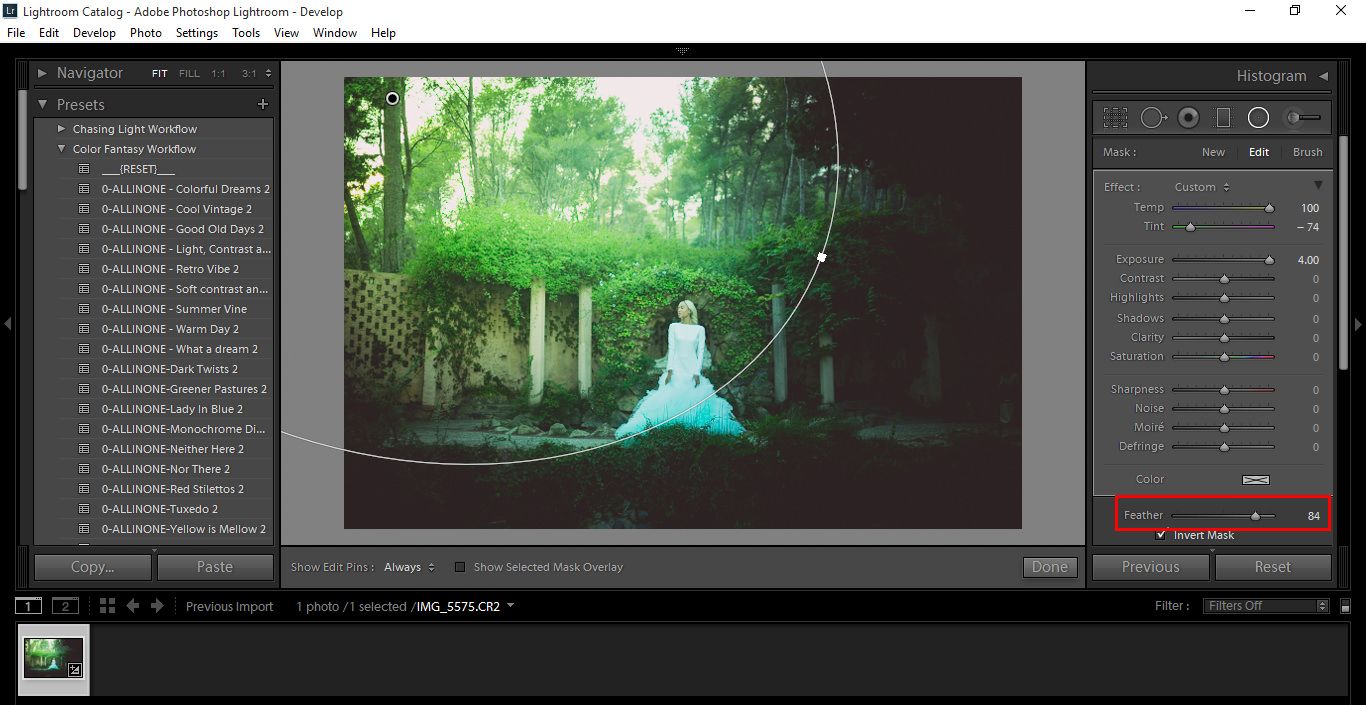
Now I think that my light source is a bit too strong around the edges, so I’m going to add a bit of Feathering to it, just to soften it out and give it a bit more of a realistic gradient.
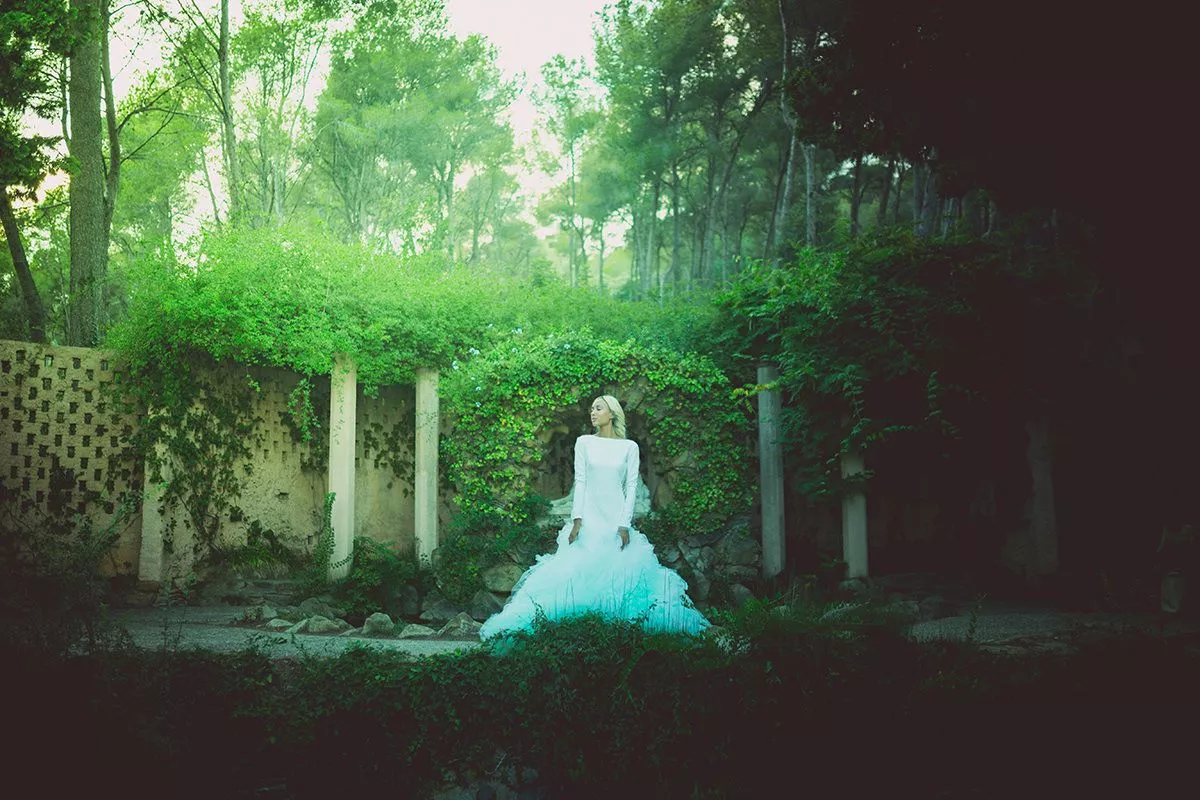
I’m loving the contrast between the cool and cold colors, so I think I’ll leave it at that, as I’m very happy with the result. I have to admit that the presets really helped me out with this and the sun flare was the icing on the cake.
So check out my final result, look how awesome that is 🙂
The lens flare effect was actually started by accident, as there weren’t many photographers who wanted circles, rings, or starbursts to disrupt a portrait or landscape. But now many photographers have embraced lens flare as a way to add some flair (pun intended) to a picture. What has now become a deliberate style choice can add some general warmth to a photo or place a dramatic halo or light burst into an image.
The way to get lens flare is basically to shoot into the light – which seems counterintuitive to most photographers, but yields some artistic results. Older lenses without anti reflective coating are best to use, as are lenses without a hood. Lens flare effects can also be added with some photoshop overlays like you might find in Lightroom Adobe Mobile, but if you can learn to use the natural light of sunlight in combination with the right lens element or elements, the Lightroom preset or presets you later use will just be icing on the cake of a very recognizable style.
A ghosting sun flare involves light reflecting repeatedly off the lens surface and/or its parts, creating a series of images (in this case, the sun) that progress into the picture. Sun rays become ghosting sun flares because the lens hood is allowing light to bounce around the elements of the lens, creating multiple images instead of capturing a single ray. Think of those photos with what seem like transparent planets moving away from the sun.
It’s possible to ghost with any type of light source, but the stronger the light source, the more powerful the ghosting effect. Some attributes of a lens that can contribute to ghosting include the number of lens elements (more elements means more reflections), the focal length (more length makes the light source look bigger and stronger), and whether or not the lens has an anti-glare coating.
Veiling can create a very ephemeral type of aesthetic to a photograph. Veiling happens when a light source is out of the frame and moves through the side of the lens, but rays of light are still hitting the front elements. This creates a sort of hazy look to the emerging photograph, with a mood that might be described as soft and warm.
Unfortunately, too much veiling can create an image that is so washed out it can’t even be fixed with professional Lightroom presets. If you can’t control how strong the veiling effect is from a particular angle, you might consider trying out a few different angles to shoot from. Veiling might not be right for every mood, but it can create some sentimental vintage looks to travel photography, or add a sentimental vibe to landscape photography.
The anamorphic lens can create an image with a 16:9 ratio, which is the same as a widescreen movie. But more than that, it can assist in the creation of an anamorphic flare. The anamorphic lens flare in question is a sort of horizontal flare that reminds some people of a planet with rings.
This particular effect is now very sought after and has been used by film directors like J.J. Abrams. The horizontal lines of the anamorphic lens flare are often created by the lens itself, which might horizontally compress some of the images, resulting in an axial flare instead of the traditional circular bokeh. The particular effect may be a little too dramatic for food photography or clothing photography, but when paired with the haze of some veiling, for instance, it can be the golden touch for a mood of mystery or excitement.
The Golden Hour is the period of day just before sunrise or sunset. Cinematographers and photographers have also referred to this as the magic hour, due to the warm, reddish light that permeates the atmosphere. Many types of lens flares can create a certain ephemeral, vintage, ghostly, or romantic look in a photograph, and the golden hour can as well.
Combining the ambience of the golden hour with the specific effect of a flare can create an even more specific or intense mood in whatever vein you’re going for—romantic, mysterious, or sentimental, for instance. If your shoot does not conveniently fall into the time period noted for producing these qualities using natural atmospheric lighting, our Golden Hour Lightroom presets can add a finishing touch to your photographs in the digital editing process.
The exposure triangle is the relationship between aperture, shutter speed, and ISO, which is your camera’s sensitivity to light. All three of these elements need to work together to create a photograph that has the correct exposure to light. Shutter speed is just the amount of time light is allowed to hit the camera sensor.
Aperture is the width of the hole that allows light in. And ISO is the sensitivity of the sensor itself. If you are intentionally seeking some flaring, you will have to adjust some of these factors to facilitate that—increasing the aperture, the exposure, or raising the ISO of the digital sensor. You can use the exposure triangle to limit noise (how much grain the photo has) or create interesting flares. Understanding the exposure triangle is just as vital as understanding the most common issues in Lightroom for mastering the art of photography.
Graduated from college in 2002 with a degree in Art & Design, I started exploring my way in Graphic Design and Professional Post Production. Full-time freelancer since 2011.


 Facebook
 Google +
Comments (0)
There are no comments yet.