Instagram Tip: Posting multiple images to form a seamless panoramawww.sleeklens.com
Instagram has quickly become the most popular way to share images online. The beauty of Instagram is that it is easy, free and in the palm of everyone’s hands via the ubiquitous smartphone. Whether you are interested in just sharing your daily life and holiday snaps or have a photography business that you want to promote, there is a massive worldwide audience out there that can’t be ignored.
However, the great asset of Instagram is also its downfall. It is designed for mobile phones, so as such there is very little screen real estate to work with. Many landscape photographers, for example, have traditionally been put off by Instagram. How can anyone appreciate their beautiful images on such tiny screens? Well, Instagram has been steadily adding lots of functionality to the platform and this trick makes use of the multi-post feature.
So, let’s say you’ve got this great panorama of a cityscape or landscape you have been to and want to share it with your audience. The problem is, Instagram can’t show the whole panorama. It can only manage a 3 x 2 format landscape, which will look pretty small on user’s phones. There are currently three recommended sizes for images when posting on Instagram:
Square: 1080px x 1080px recommended (600px x 600px min to 2048px x 2048px max)
Landscape: 1080px x 566px recommended (600px x 400px min to 2048px x 1365px max)
Portrait: 1080px x 1350px recommended (600px x 750px min to 1638px x 2048px max)
The aim is to use the full vertical height available on a user’s phone and be able to scroll through the whole panorama. We will use Instagram’s Multi-Post facility. The panorama will be sliced up into identically sized pieces and posted in order. Instagram won’t show them as a folder, but as one seamless panoramic image that a user can scroll through at maximum detail. The trick requires a couple of minutes of preparation in Photoshop, but it’s pretty quick and easy to do. The end result makes your feed look slick and professional.
Slicing up your panorama in Adobe Photoshop
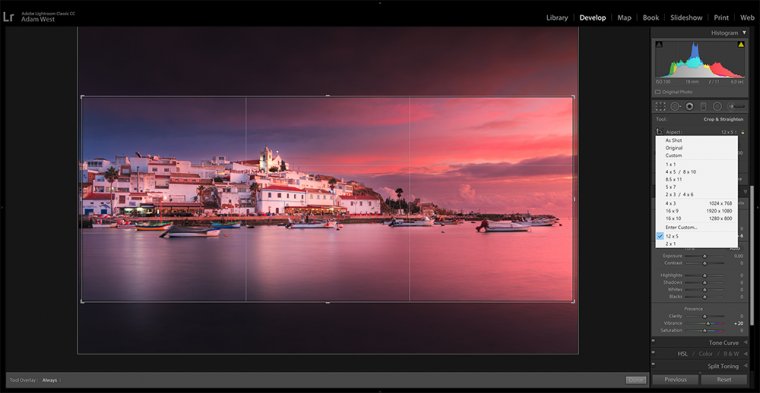
My guidance is for Adobe Lightroom and Photoshop CC, but the same can be achieved in any image software. The vertical, or portrait, aspect ratio in Instagram is 4w x 5h. You firstly need to decide how many vertical slices to break your image into and how you will crop your panorama to fit. I start with a panorama that is already processed and ready to share in Lightroom. I am thinking of posting it as three vertical slices, so in the Develop module I select the Crop Overlay tool and set a custom aspect ratio of 12 x 5. I can therefore easily see exactly where to frame my overall panorama and where the slices will appear. Once you have decided on your crop, right-click and select Edit In > Edit in Adobe Photoshop (select the Lightroom adjusted option if asked).
Making a custom crop in Lightroom. 3 times 4w x 5h = 12w x 5h
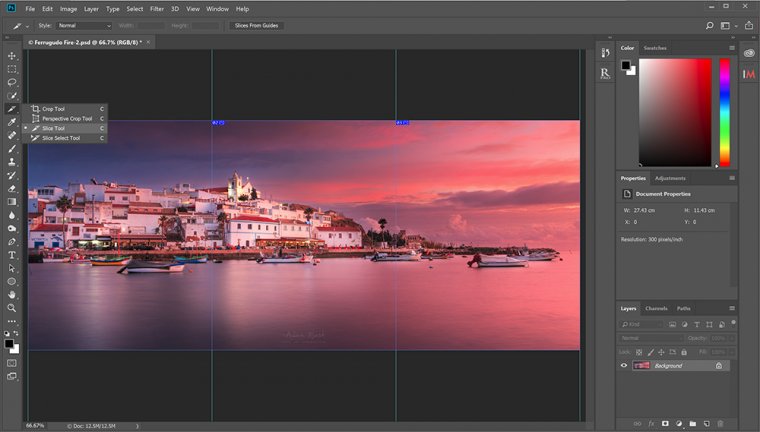
With your panoramic image open in Photoshop, go to View > New Guide Layout. Set 3 columns and make sure that width and gutter have no value. Now you should see guides separating the image into three. Next, we need to slice the image using these guides. On the left-hand tools menu, click and hold the Crop tool and select the Slice tool. On the top bar, click the “Slices From Guides” button. You should now see each slice numbered 1 to 3. Finally, we resize our image before saving the slices. We want each slice to be 1080px wide. So click Image > Image Size and type in 3240 for the pixel width in my case. You need to resize for how many slices of 1080px that you have.
Quickly slicing a panorama in Photoshop
Now we save the images. Go to File > Export > Save For Web. Make the export a JPEG, quality of 100 and click Save. Before you save, make sure that All Slices is selected. I save to a folder that is mirrored to an online space that you can easily view on your phone.
Making a seamless multi-post on Instagram
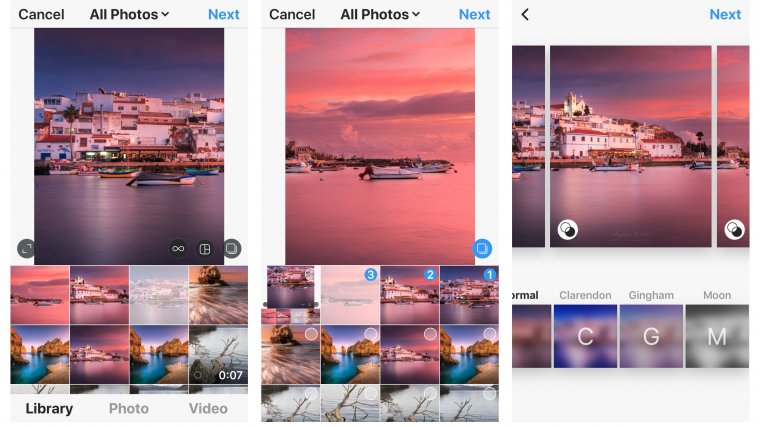
In Instagram, select your first photo slice (Instagram shows the slices from left to right) and tap on expand arrows so that the whole slice is shown rather than the default 1×1 crop. This is critical! Otherwise, some or all of your slices will be 1 x 1 crop instead of 4 x 5 crop and they may not line up in the final panorama. Now tap on the multi-post icon (looks like a stack of images) and your image is labeled as 1. Now tap on the second slice (labeled 2). It should be shown in the 4 x 5 format but pinch and zoom out to be sure. Repeat until all your panorama slices are selected and tap Next.
First image in 4 x 5 ratio
Multi-post rest of images
Make sure they line up
Review the panorama to make sure that everything lines up. You will see white vertical lines between each slice at this stage, but they disappear after you post. You can make image adjustments at this stage, but be very careful to make sure the same adjustments are applied to each image slice. Add an interesting comment, tag the location and any people and post. Quickly review your post. You should see that it the image fills the available screen space and scrolls seamlessly across the whole panorama. Your followers will be impressed! If there is a problem with your seamless panorama not lighting up, delete it and repeat the above steps taking care to make sure each slice is loaded into the correct aspect ratio.
That’s it. You’re an Instagram genius! The only extra thing to think about with seamless multi-post panoramas is that Instagram shows only a 1 x 1 crop of your first leftmost image slice on your feed summary. So make sure there is sufficient interest on the left of your panorama to make people want to click on it and enjoy the full image!
Software used
Adobe Lightroom Classic CC and Photoshop CC (monthly subscription)
Instagram (free iOS and Android mobile app)
Details of all of the equipment and software I use and recommend can be found on my website https://www.adamwest.co.uk/p/inmybag
Adam is a passionate landscape, nature and travel photographer based in Scotland.
All of the images in this blog are the copyright of Adam West.
Click on his name to see more of his work and get in touch.
Hi there. Thanks for this. I got small white lines when posting on insta though- at the two slicing locations. It’s somewhat noticeable in my pic as there’s a lot of blue sky. Any idea how to rectify this?


 Facebook
 Google +
Comments (1)
Hi there. Thanks for this. I got small white lines when posting on insta though- at the two slicing locations. It’s somewhat noticeable in my pic as there’s a lot of blue sky. Any idea how to rectify this?