How To Whiten Teeth And Touch Up Faces In Lightroomwww.sleeklens.com
Sometimes, when we are taking portraits, especially candid wedding shots, we are more focused on the emotion of the person sitting in front of us, rather than our camera settings, lighting, etc. We get caught up in the moment and when we get home, the image or photo we upload doesn’t have quite the right feeling that we were hoping for.
Here are several easy steps to know how to whiten teeth in Adobe Lightroom classic or photoshop, editing portraits and touching up faces in Lightroom presets to get stunning, lively images. The goal is to show you some easy ways to make your photos pop and give some personality back to your subject! And each step explained can be applied to almost any portrait you take! And if you want to know more, just click here.
We have the image or photo of this outdoorsy, very friendly man. He looks a bit cold, but his smile and eyes are inviting. Let’s bring him into Lightroom presets, click this link, and edit him to ensure we capture the essence of who he is!
Table of Contents
Basic Adjustments in Lightroom
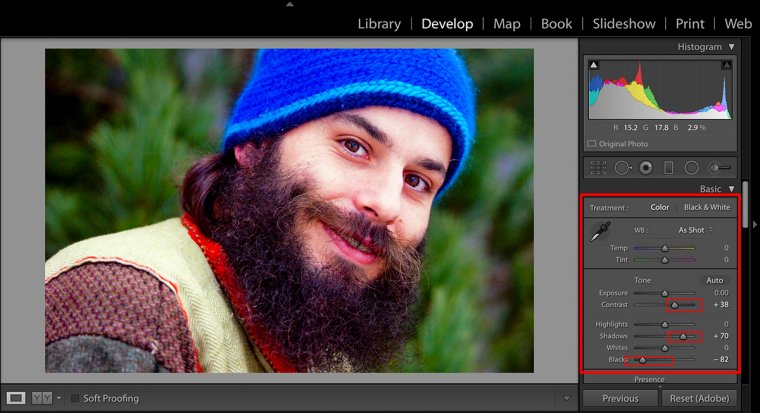
In your Basic Adjustment Panel, let’s change the contrast, shadows and blacks. Each of these makes the subject pop a little bit more by giving the image or photo some deeper blacks overall.
Increasing contrast by +38 points eliminates some of the mid-tones of the image or photo making the image more contrasted.
Increasing shadows by +70 points ensure that we’re not losing key details in the darker areas of the image, like his beard.
Decreasing the blacks clipping by -82 points clips some of the blacks to help maintain some of the contrast going on.
We didn’t really change a lot, but he is already looking better.
Next, let’s focus on minor facial adjustments.
Blemish Removal in Lightroom
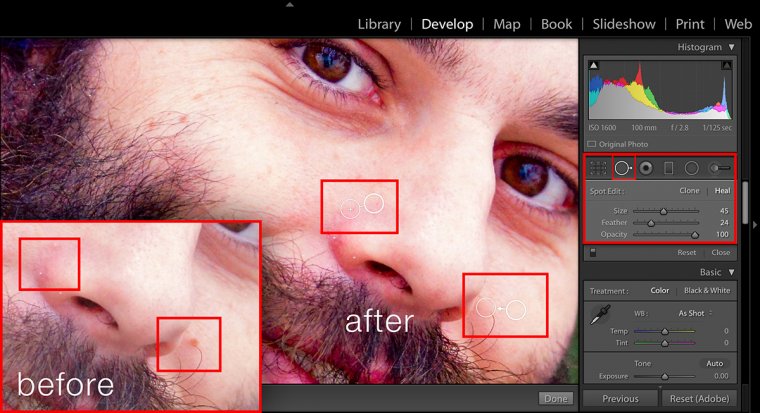
To begin touching up blemishes or other problem areas on the person’s face, click on the Spot Remover tool on the upper left side of your editing brush panel.Set your sizes, feather and opacity so that you can remove the portion you need in one click.
If you notice, ours is set at about the size of each blemish. It’s important to ensure we are in heal mode rather than clone mode, so there aren’t any noticeable circles where we are fixing things. Then click on the portion, acne, blemishes etc that we want to get rid of. For now, he just has two noticeable blemishes. Make sure the area that is replacing the blemish is close in color and texture to your blemish area. If your subject has many blemishes, also try using the soften skin brush.
With this portrait, we avoided the soften skin brush because he started to look very “photoshopped,” and he lost a bit of his rough, outdoorsy look. The soften skin brush can help with faces that have a lot of blemishes, oily skin and lots of pores.
How to whiten teeth in Lightroom?
There are times while clicking a picture when your teeth are shown dark due to lighting effects, therefore, it is always better to use teeth whitening tools. There are many professional ways you can learn on how to whiten teeth in Lightroom but we have picked the easiest one. But if you want to know how to whiten teeth for real, then you should click on the link.
In order to get the best teeth whitening results, you first have to choose the right brush size that would fit the teeth size. If you are using a brush with a smaller size, I will take much longer to apply the teeth whitening effect. Within the Whitening Teeth tool, you can adjust the brush size as per your need.
Among various other features, Adobe Lightroom has such as the blur tool, brush tool, spot removal, etc, there is one unique tool that helps in whitening teeth. It helps in tackling with one of the biggest challenges associated with whitening teeth and that is getting the correct balance of whitening teeth. All thanks to Preset Lightroom Portrait Brushes, Whitening teeth and eyes is now an easy task.
How to choose the teeth whitening effect in Lightroom?
The Teeth Whitening effect can be found in the Develop module of Adobe Lightroom.
Even if you know how to whiten teeth in Lightroom, you should read this one. Who knows, you may end up knowing something new.
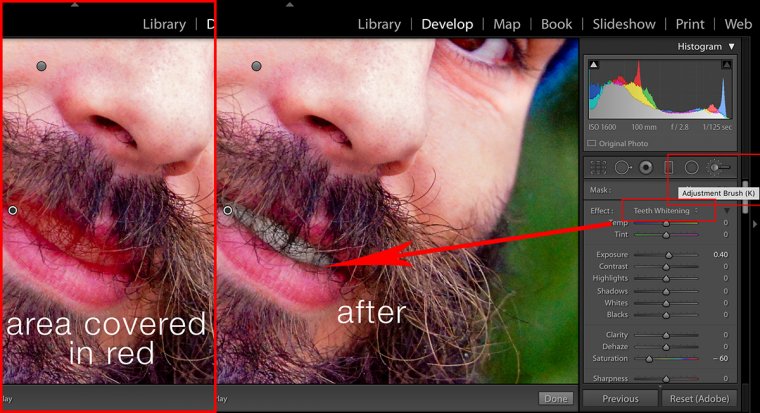
For most individuals, the teeth whitening set using the standard adjustment brush works pretty well! For this guy, his teeth aren’t showing that much, but here’s how to do it.
Like this tutorial on teeth whitening? Share the article with your friends!
Basically, just set the brush to the right brush size with the help of a brush tool, and “paint” over his teeth! Then voila, whiter teeth! If the teeth start to look to white, play with the size, feather, flow and especially density setting to get it right.
Eye Adjustments in Lightroom
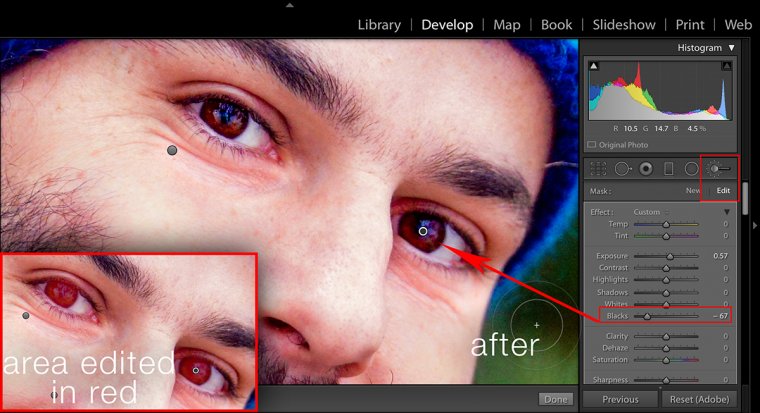
In the adjustment brush editor of lightroom, there is an option for photo editing irises; however, since his eyes are so dark, the custom setting worked just fine. The iris brush brightened his eyes too much and he started to look like an alien! Like with the teeth whitening, “paint” over the part you want to be adjusted, but then this time, move the blacks slider to -67 to make his eyes a bit deeper and darker in colour. And there you will see teeth whitening getting done easily.
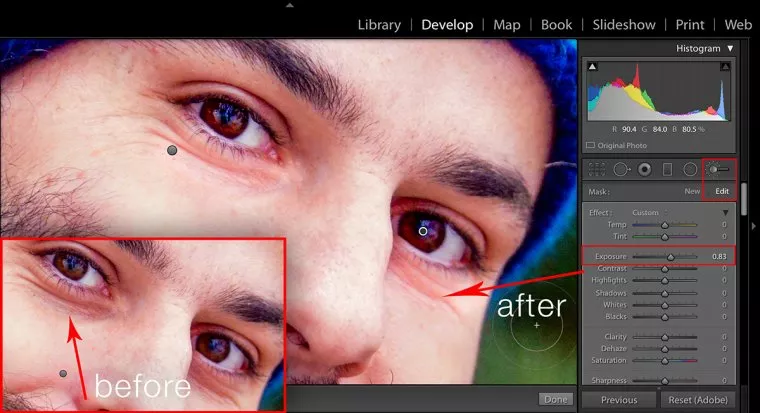
The other adjustment you can make to someone’s eyes in lightroom is removing the dark circles underneath. Similarly to how we just edited his eyes, click on new underneath the adjustment brush icon and then set the brush to exposure. “Paint” in the dark areas underneath his eyes and move the exposure slider to +.83. We don’t want to bring the exposure up too much or it’ll be noticeable that only those portions were brightened!
And there you have it, the finished portrait. What we primarily did is increase the contrast in the original image. In the adjustments, we tweaked the blacks so that they stood out a bit more than the colors. Then we removed some blemishes, made the model’s teeth whiter and opened his eyes by darkening the irises and lightening the circles underneath.
For each portrait, this should only take you max five to 10 minutes if you know your way around Adobe Lightroom. We really strived to make the image or photo look great, but not too edited. This is a super-easy way to touch up faces in post-production for portraits that really grab the viewer’s attention. Do you like our method on how to whiten teeth in Lightroom and teeth whitening? How about our post about creating collages in Lightroom?
Have something different to say, send us a mail now.
Before I became Editor-in-Chief of PHLEARN Magazine, I spent over five years specializing in Photography Writing and contributed articles regularly to sites like PictureCorrect, Sleeklens, and PhotoWorkout. Photography has always been a huge passion of mine; I may not be professionally trained in the art, but the knowledge and experience I have gained writing about photography techniques, interviewing some of the biggest and most inspiring photographers out there, and covering industry events has been invaluable!


 Facebook
 Google +
Comments (0)
There are no comments yet.